Lateral Lumbar Interbody Fusion (LLIF / XLIF / OLIF) — Complete Exercise Program
Looking for a shorter starting point? The Lateral Lumbar Interbody Fusion (LLIF / XLIF / OLIF) starter guide covers the first 8 exercises on a printable sheet.
A phase-by-phase exercise program used in recovery for lateral lumbar interbody fusion (llif / xlif / olif). Each movement includes what it's working on and how it's typically performed. Your own surgeon's or therapist's guidance always comes first.
Immediate Recovery
Weeks 0–2
Walking Program
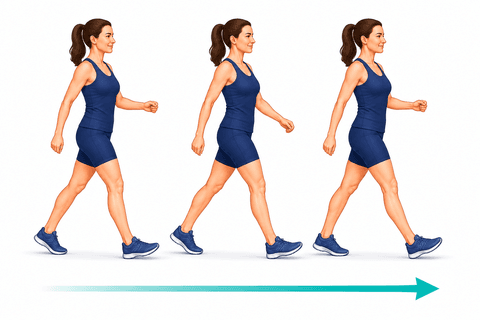
Short, frequent walks build endurance and confidence.
What it helps: Comfortable, frequent walking keeps the joints loose, builds your stamina, and rebuilds confidence on your feet. Little and often beats long and tiring.
- Take short walks at a comfortable pace.
- Increase your distance gradually as you feel able.
Tips:
- Use your assistive device as directed.
Commonly done throughout the day.
Ankle Pumps
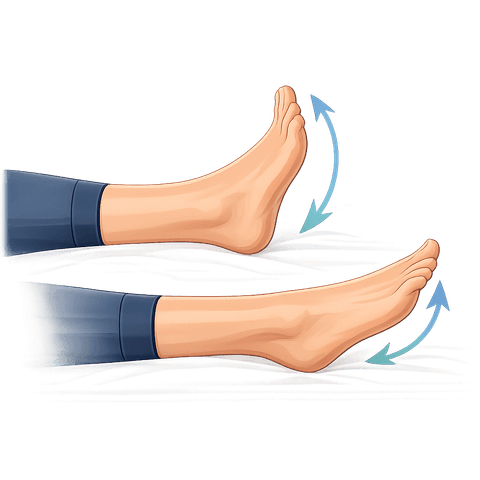
Improves circulation and helps reduce swelling.
What it helps: Keeps blood moving to reduce swelling and the risk of clots while you're less active — small, frequent, and important early on.
- Flex your foot up, pointing your toes toward the ceiling.
- Point your toes down, away from your body.
Tips:
- Move slowly and with control.
Commonly done as 20 repetitions, several times a day.
Diaphragmatic Breathing
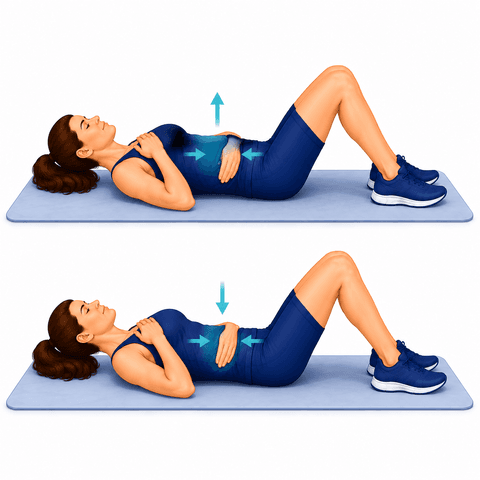
Calms the nervous system and gently wakes up your deep core without straining the back.
What it helps: Calms the nervous system and gently engages your deep core — a relaxed, supported way to start any session.
- Lie on your back, knees bent, one hand on your chest and one on your belly.
- Breathe in slowly through your nose so your belly rises while your chest stays still.
- Breathe out slowly through pursed lips, letting your belly fall.
Tips:
- Keep it relaxed — never force the breath.
- Useful any time you feel tense or sore.
Commonly done as 5–10 breaths repetitions, several times a day.
Glute Squeezes
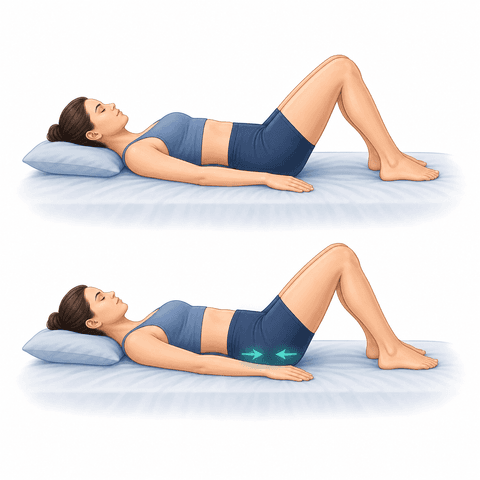
Gently re-engages the buttock muscles.
What it helps: Wakes up the glutes — the big muscles that steady and support your hip. Getting them firing again is the first step toward a hip that feels stronger and carries you with less strain on the joint.
- Lie or sit comfortably.
- Squeeze your buttock muscles together.
- Hold a few seconds, then relax.
Commonly done as 2-3 sets of 10, a few times a day.
Standing Marches
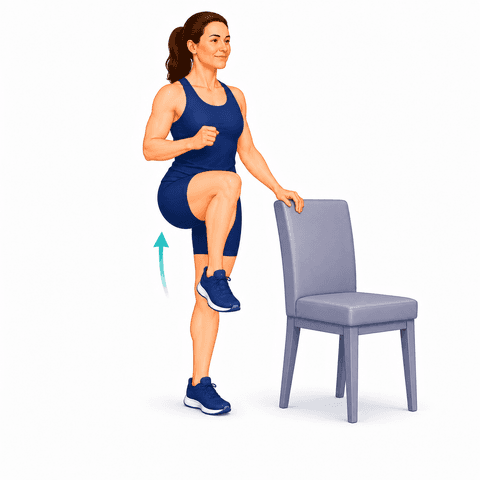
Improves hip mobility, balance, and walking mechanics.
What it helps: Builds the hip and core strength to lift each leg and step with control — rebuilding the basics of walking.
- Stand tall holding a counter or sturdy surface.
- Lift one knee up toward your hip, then lower it back down.
- Alternate legs.
Tips:
- Keep your back straight and core gently engaged.
Commonly done as 2-3 sets of 10-20, 1-2x daily.
Heel Slides
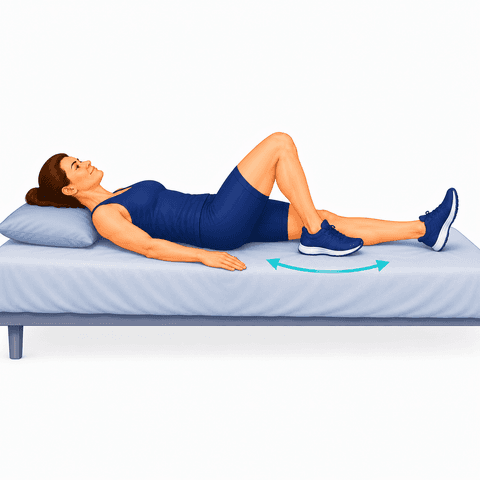
Encourages early, gentle knee motion.
What it helps: Coaxes gentle bending back into the knee — restoring the motion you need for stairs, sitting, and getting in and out of a car.
- Lie on your back with your legs straight.
- Slowly slide your heel toward you, bending the knee.
- Slide it back down.
Tips:
- Only go as far as is comfortable.
Commonly done as 2-3 sets of 10, a few times a day.
Gentle Nerve Glides
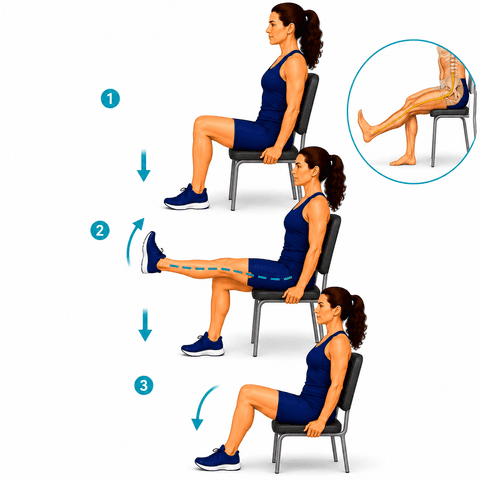
Helps a healing nerve move freely and can ease leg symptoms — gentle, never into sharp pain.
What it helps: Helps a healing nerve slide freely, which can ease leg or arm symptoms. Gentle is the rule — never push into sharp pain.
- Sit tall in a chair.
- Slowly straighten one knee while flexing your foot up, until you feel a light stretch down the leg.
- Bend the knee back down — move in and out smoothly.
Tips:
- Stay in a gentle, pain-free range.
- Stop if it sharply increases leg pain.
Commonly done as 1–2 sets of 10, 1–2 times a day.
Sit-to-Stand
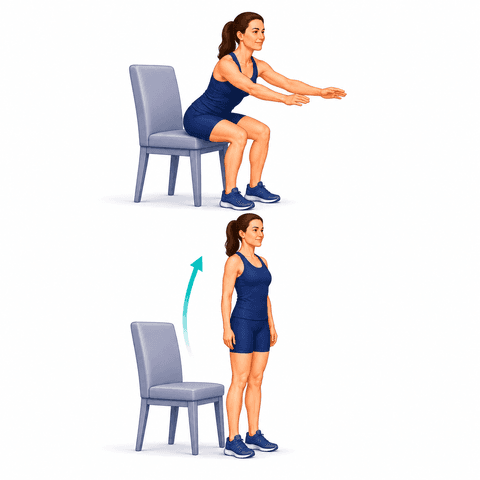
Builds the strength and confidence to rise from a chair.
What it helps: Trains the exact strength you use to rise from a chair, a toilet, or a car. Stronger here means more independence and less of a struggle on tough days.
- Sit at the edge of a sturdy chair.
- Lean slightly forward and stand up.
- Lower yourself back down with control.
Tips:
- Use your arms for support as needed.
Commonly done as 2-3 sets of 8-10, once or twice a day.
Posture Training
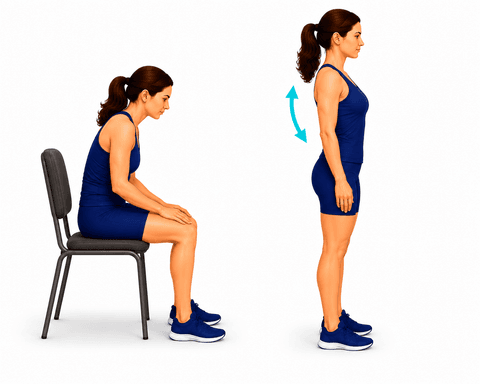
Trains a neutral spine for sitting, standing, and lifting safely.
What it helps: Trains a neutral, balanced spine for sitting, standing, and lifting — good posture takes strain off the back all day long.
- Sit or stand tall, stacking ears over shoulders over hips.
- Gently draw your shoulder blades down and back.
- Hold a tall, relaxed neutral position; reset whenever you slouch.
Tips:
- Set reminders to check your posture during the day.
- A small lumbar roll helps when sitting.
Commonly done throughout the day.
Early Recovery
Weeks 2–6
Walking Program
Short, frequent walks build endurance and confidence.
What it helps: Comfortable, frequent walking keeps the joints loose, builds your stamina, and rebuilds confidence on your feet. Little and often beats long and tiring.
- Take short walks at a comfortable pace.
- Increase your distance gradually as you feel able.
Tips:
- Use your assistive device as directed.
Commonly done throughout the day.
Standing Marches
Improves hip mobility, balance, and walking mechanics.
What it helps: Builds the hip and core strength to lift each leg and step with control — rebuilding the basics of walking.
- Stand tall holding a counter or sturdy surface.
- Lift one knee up toward your hip, then lower it back down.
- Alternate legs.
Tips:
- Keep your back straight and core gently engaged.
Commonly done as 2-3 sets of 10-20, 1-2x daily.
Glute Squeezes
Gently re-engages the buttock muscles.
What it helps: Wakes up the glutes — the big muscles that steady and support your hip. Getting them firing again is the first step toward a hip that feels stronger and carries you with less strain on the joint.
- Lie or sit comfortably.
- Squeeze your buttock muscles together.
- Hold a few seconds, then relax.
Commonly done as 2-3 sets of 10, a few times a day.
Straight Leg Raises
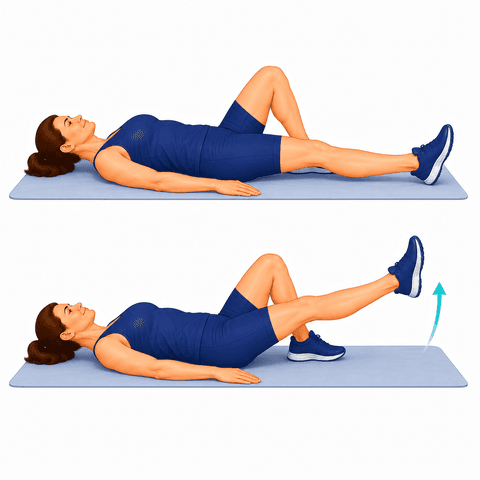
Strengthens the thigh while protecting the joint.
What it helps: Builds quad and hip strength while the knee stays straight, so the muscle works hard without stressing the joint.
- Lie down with one leg bent and the other straight.
- Tighten your thigh and lift the straight leg a few inches.
- Lower slowly.
Tips:
- Keep the knee straight as you lift.
Commonly done as 2-3 sets of 10, once or twice a day.
Hamstring Stretching
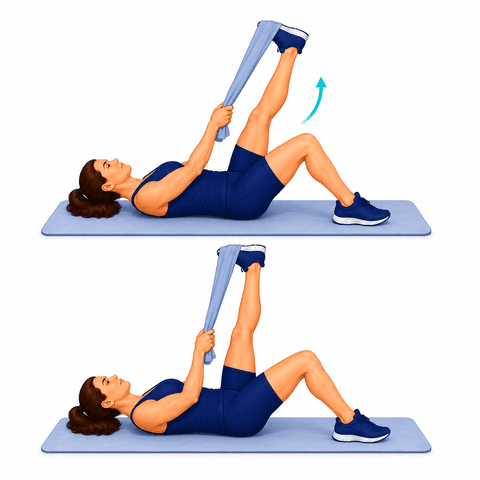
Eases tightness behind the thigh that can pull on the low back.
What it helps: Keeps the back of the thigh flexible so the knee and hip move freely and your stride stays easy.
- Lie on your back and loop a towel around one foot.
- Gently straighten the knee toward the ceiling until you feel a light stretch.
- Hold, then relax.
Tips:
- Stretch to mild tension, not pain.
- Breathe and ease into it.
Commonly done as hold 20–30s sets of 2–3 reps, 1–2 times a day.
Figure-4 (Piriformis) Stretch
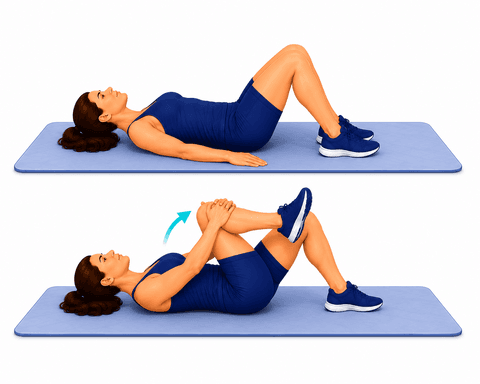
Eases tightness deep in the buttock that can travel into the hip.
What it helps: Eases tightness deep in the buttock that can travel into the hip, keeping the area loose and comfortable.
- Lie on your back with both knees bent.
- Cross one ankle over the opposite thigh to make a "figure 4".
- Reach through and gently pull the lower thigh toward you until you feel a stretch in the buttock.
- Hold, then switch sides.
Tips:
- Keep your head and shoulders relaxed on the floor.
- A gentle, comfortable stretch is all you need.
Commonly done as hold 20–30s sets of 3 each side, daily.
Standing Hip Abduction
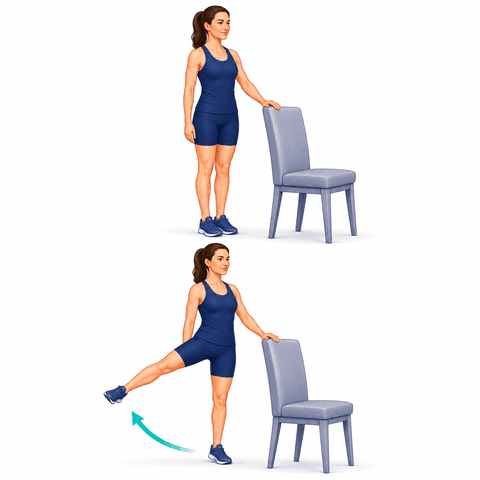
Strengthens the muscles on the side of the hip.
What it helps: Strengthens the outer-hip muscles that hold you steady whenever you're on one leg — which is every step you take. Stronger here, steadier hip.
- Stand holding a counter for support.
- Lift your leg out to the side, keeping it straight.
- Lower slowly.
Tips:
- Keep your toes pointing forward.
Commonly done as 2-3 sets of 10-15, 1-2x daily.
Gentle Nerve Glides
Helps a healing nerve move freely and can ease leg symptoms — gentle, never into sharp pain.
What it helps: Helps a healing nerve slide freely, which can ease leg or arm symptoms. Gentle is the rule — never push into sharp pain.
- Sit tall in a chair.
- Slowly straighten one knee while flexing your foot up, until you feel a light stretch down the leg.
- Bend the knee back down — move in and out smoothly.
Tips:
- Stay in a gentle, pain-free range.
- Stop if it sharply increases leg pain.
Commonly done as 1–2 sets of 10, 1–2 times a day.
Posture Training
Trains a neutral spine for sitting, standing, and lifting safely.
What it helps: Trains a neutral, balanced spine for sitting, standing, and lifting — good posture takes strain off the back all day long.
- Sit or stand tall, stacking ears over shoulders over hips.
- Gently draw your shoulder blades down and back.
- Hold a tall, relaxed neutral position; reset whenever you slouch.
Tips:
- Set reminders to check your posture during the day.
- A small lumbar roll helps when sitting.
Commonly done throughout the day.
Strength & Function
Weeks 6–12
Progressive Walking Program
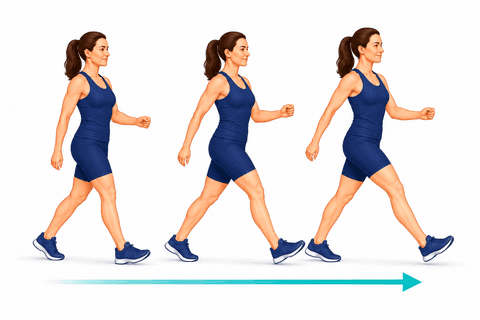
Keep building your walking distance and pace.
What it helps: Keep building your walking distance and pace — steady gains in endurance and confidence on your feet.
- Walk on level ground at a comfortable pace, landing on the heel and rolling through the foot.
- Add a few minutes to the walk before you add speed or hills.
- Go a little further each week rather than a lot further in one day.
Tips:
- Turning back while you still feel good is how the distance builds.
- Supportive shoes make more difference than the route does.
- The three figures here are the same walk with a longer stride, not a faster one - an even stride matters more than pace.
Commonly done daily.
Abdominal Bracing
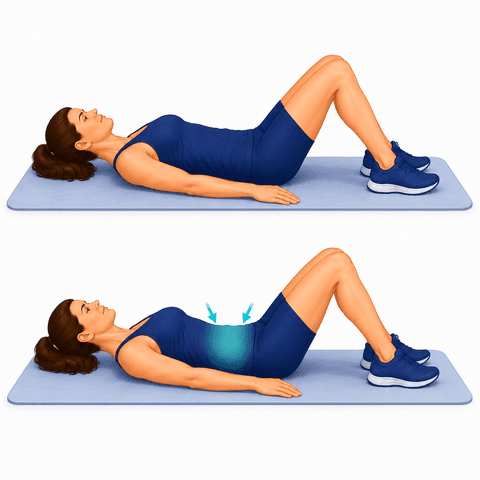
Builds gentle deep-core support that protects your spine during daily movement.
What it helps: Switches on the deep core muscles that stabilize and protect your spine through everyday movement — lifting, bending, twisting.
- Lie on your back with knees bent.
- Gently tighten your stomach as if bracing for a light poke — do not suck in or hold your breath.
- Hold the light tension while breathing normally, then relax.
Tips:
- Aim for about 20% effort, not a maximal squeeze.
- Brace before you roll, stand, or reach.
Commonly done as hold 5–10s sets of 10, a few times a day.
Bridges
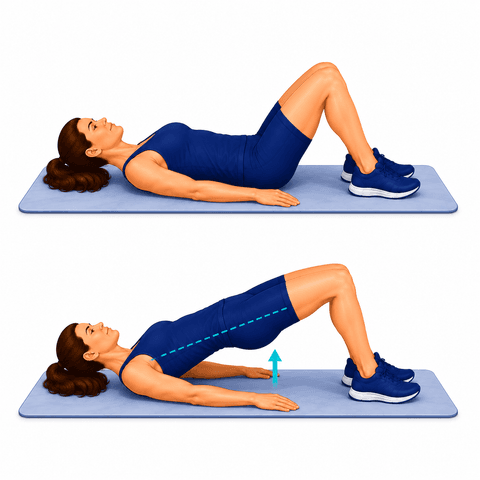
Strengthens the glutes and core that support the low back.
What it helps: Builds the glutes and core together, giving your hips and low back a strong, stable base to move from — so the muscles do the work instead of the joints.
- Lie on your back, knees bent, feet flat.
- Brace your core and squeeze your glutes to lift your hips into a straight line.
- Lower slowly with control.
Tips:
- Keep your stomach gently braced — do not arch your back.
- Drive through the glutes, not the low back.
Commonly done as 2 sets of 10–15, daily.
Clamshells
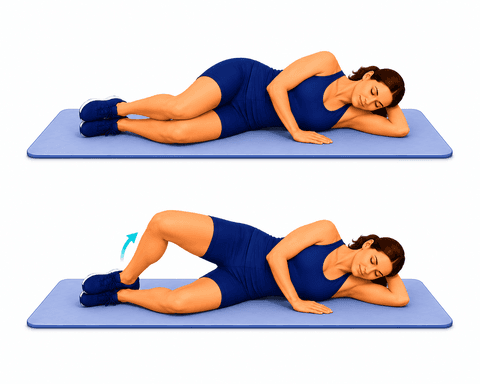
Strengthens the hip and glute muscles that stabilize the pelvis and spine.
What it helps: Targets the muscles on the side of the hip that keep your pelvis level when you walk. Strong here, your hip tracks smoothly and shares load more evenly — steadier, more comfortable steps.
- Lie on your side, knees bent and stacked.
- Keeping feet together and pelvis still, lift the top knee like a clamshell opening.
- Lower slowly.
Tips:
- Do not let your pelvis roll back.
- Feel it in the side of the hip.
Commonly done as 2 sets of 12–15 each side, daily.
Standing Hip Extension
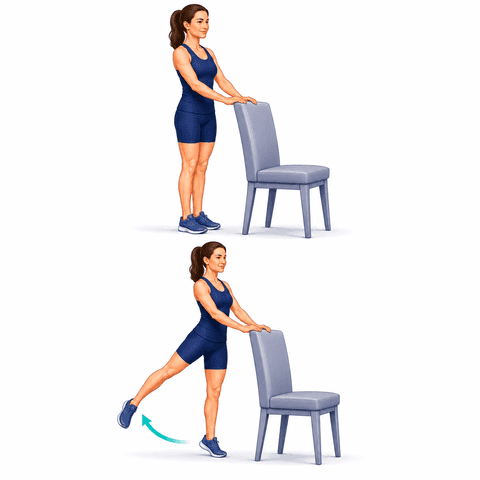
Strengthens the muscles behind the hip.
What it helps: Strengthens the muscles behind the hip that power you forward with each step and help you stand tall — the engine of a strong, even stride.
- Stand holding a counter.
- Move your leg straight back without arching your back.
- Lower slowly.
Commonly done as 2-3 sets of 10-15, 1-2x daily.
Resistance Band Hip Strengthening
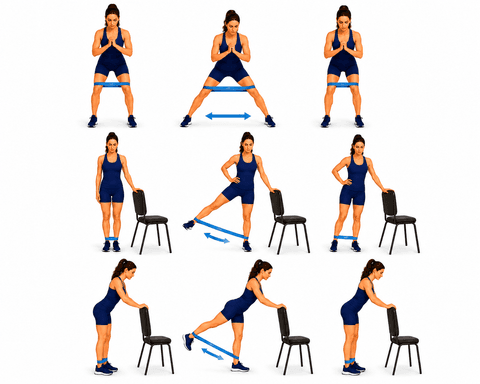
Builds hip and glute strength in every direction with a band.
What it helps: Strengthens the hip in every direction with a band, building the all-around support that keeps the joint stable as you move.
- Loop a band around your legs (above the knees or ankles).
- Perform side steps, hip abductions, or extensions against the band.
- Control the movement out and back.
Tips:
- Keep your core braced and trunk steady.
- Increase band resistance gradually.
Commonly done as 2 sets of 10–15, 3–4 times a week.
Core Stabilization
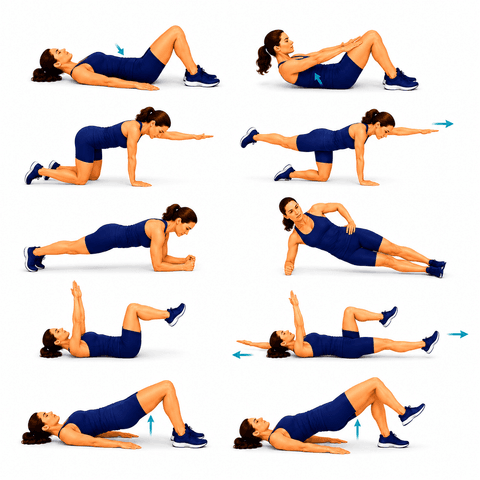
Trains your deep core to hold a steady, protected spine.
What it helps: Strengthens the core that holds your pelvis and spine steady, so your hips move from a strong, controlled base.
- Brace your core gently to keep your spine neutral.
- Add a small challenge — a marching foot, an arm reach, or a dead-bug motion — without letting your back move.
- Return and repeat.
Tips:
- The goal is a still spine, not a hard crunch.
- Stop if your back starts to move or ache.
Commonly done as 2 sets of 8–10, daily.
Stationary Bike
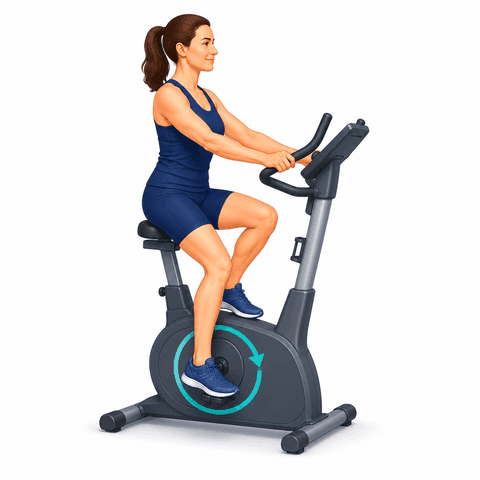
Builds motion and endurance with low impact.
What it helps: Keeps the joints moving and nourished while you build endurance — all with no pounding. One of the gentlest ways to stay active when a joint is sore.
- Set the seat so pedaling is comfortable.
- Pedal at an easy pace.
- Increase your time gradually.
Commonly done as directed.
Balance Training
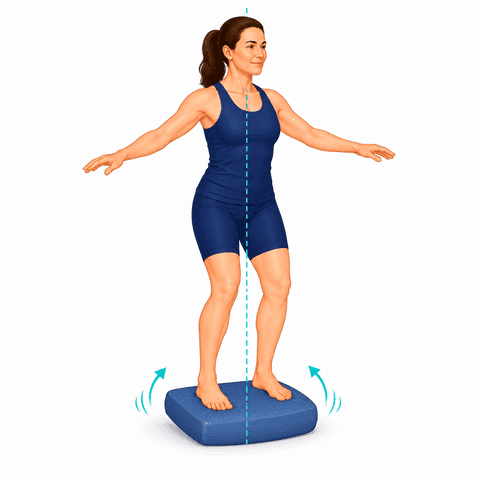
Ongoing balance work for steady movement.
What it helps: Sharpens your steadiness and reactions so you move with confidence and lower your risk of a fall — protecting the progress you've made.
- Stand with your feet hip-width apart on a soft surface such as a balance pad, with something solid within reach.
- Let your arms come out to the sides and settle over your midline - weight even, hips level.
- Hold steady for up to a minute, then step off and rest.
- As it gets easier, bring your feet closer together or close your eyes briefly.
Tips:
- A firm cushion or a folded towel works if you do not have a pad.
- Stand near a counter or a wall so there is always something to reach for.
- Some wobble is the exercise working, not a sign you are doing it wrong.
Commonly done a few times a week.
Advanced Recovery
Months 3–6
Walking Program
Short, frequent walks build endurance and confidence.
What it helps: Comfortable, frequent walking keeps the joints loose, builds your stamina, and rebuilds confidence on your feet. Little and often beats long and tiring.
- Take short walks at a comfortable pace.
- Increase your distance gradually as you feel able.
Tips:
- Use your assistive device as directed.
Commonly done throughout the day.
Cycling
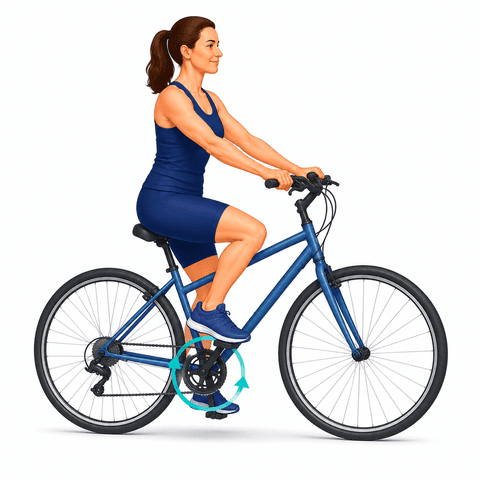
Low-impact endurance and motion.
What it helps: Low-impact endurance that keeps the joints moving smoothly while you build fitness — easy on the body, good for the long run.
- Set the saddle so your knee stays slightly bent at the bottom of the pedal stroke.
- Begin with light resistance on flat ground, pedalling smooth, full circles.
- Build the time you ride before you build the resistance or the hills.
Tips:
- Many people start on a stationary bike and move outdoors, as drawn here, once balance and confidence are back. The pedalling is the same either way.
- A saddle set too low is the usual reason a hip or knee feels cramped while riding.
- Your surgeon can say when getting onto a road bike is reasonable for you.
Commonly done as able.
Swimming
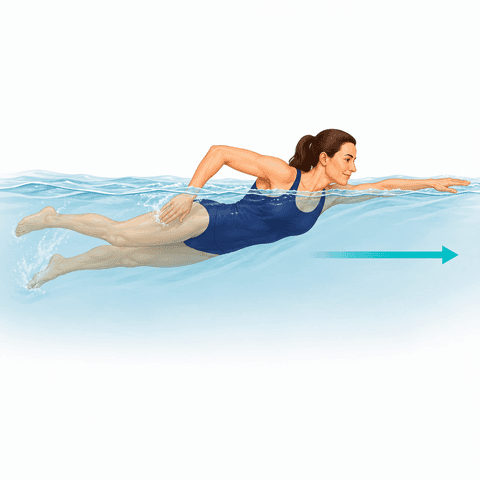
Low-impact, full-body conditioning.
What it helps: Full-body conditioning with the water carrying your weight, so your muscles work hard with almost no load on the joints.
- Wait until any wound is fully healed and you have been cleared to swim.
- Start with a few easy lengths, resting between them.
- Build the distance gradually across sessions rather than within one.
Tips:
- The picture shows front crawl. Which stroke suits you depends on which joint was operated on, and your care team can say which to begin with.
- The water carries most of your weight, so a session can feel easier than it was - judge it by how you feel the next day.
- Walking in chest-deep water is a gentler place to start than swimming lengths.
Commonly done as able.
Elliptical Trainer
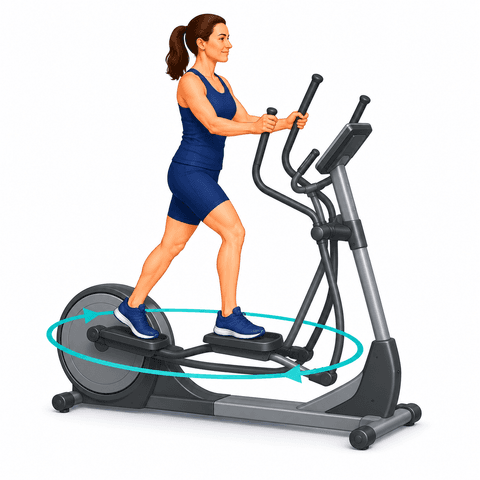
Low-impact cardio that is easy on the joints.
What it helps: Low-impact cardio that builds endurance and keeps the legs moving while staying easy on the joints.
- Step on with your feet flat on the pedals and take hold of the moving handles.
- Start with low resistance and let your legs trace smooth ovals, keeping your heels down.
- Stay upright rather than leaning your weight onto the handles.
- Build the time first and the resistance later.
Tips:
- Your feet never leave the pedals, which is what makes this gentler on the joints than a treadmill.
- The moving handles bring the arms in. The fixed centre bars are there instead if you would rather steady yourself.
- Ten easy minutes is a reasonable place to start.
Commonly done as able.
Modified Bird Dog
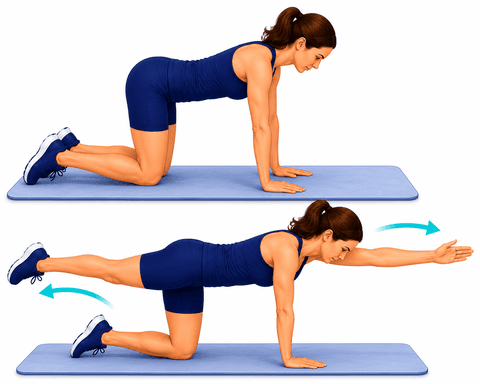
An early, gentle core-stability drill — one limb at a time.
What it helps: An early, gentle way to build core stability one limb at a time, training your trunk to stay steady as you move.
- On hands and knees, brace your core to keep your spine still and level.
- Slowly slide one arm forward OR one leg back, keeping your back from sagging or twisting.
- Return and switch sides.
Tips:
- Move only as far as you can keep your spine perfectly still.
- Start with just the arms, or just the legs.
Commonly done as 1–2 sets of 8 each side, daily.
Bird Dog
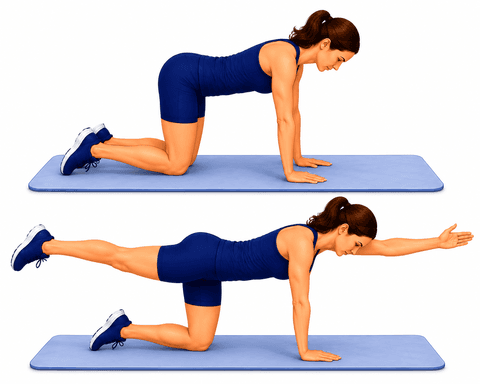
Builds core stability by holding a steady spine while moving opposite arm and leg.
What it helps: Builds core control and balance while your arms and legs move — a steadier trunk means a steadier hip underneath you.
- On hands and knees, brace your core.
- Reach one arm forward and the opposite leg back until level with your body.
- Hold briefly, return with control, then switch sides.
Tips:
- Keep hips and shoulders square — no twisting.
- Quality over speed.
Commonly done as 2 sets of 8–10 each side, daily.
Core Strengthening
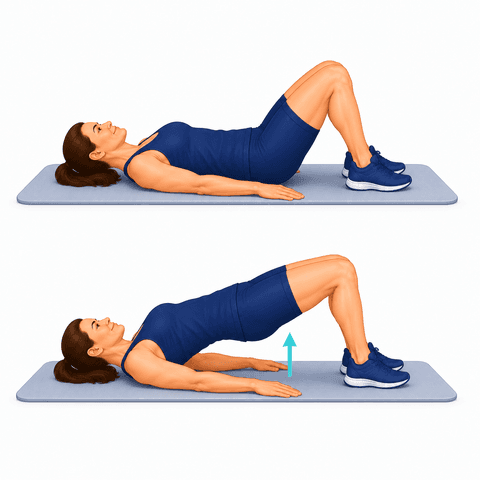
Supports posture and overall stability.
What it helps: Builds the core that holds your trunk steady, supporting your posture, your back, and everything you do on your feet.
- Lie on your back with your knees bent, feet flat and arms resting at your sides.
- Gently tighten your stomach muscles, as though bracing.
- Lift your hips until your body makes a straight line from shoulders to knees.
- Hold for a few seconds, then lower slowly.
Tips:
- Push through your heels and let your shoulders stay resting on the floor.
- Breathe normally through the hold rather than holding your breath.
- The bridge shown here is one of several ways to work the core - your therapist may give you others.
Commonly done a few times a week.
Functional Strength Training
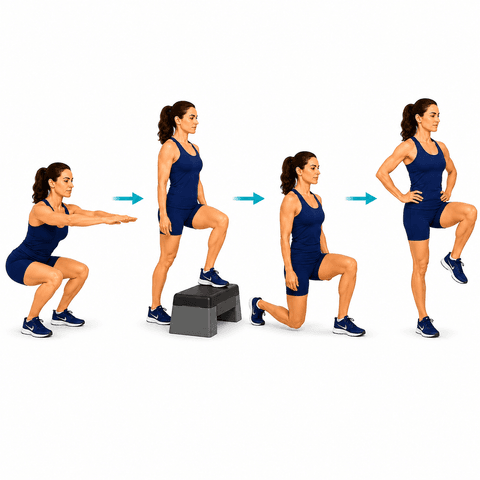
Task-based strengthening that rebuilds the movements of daily life and activity.
What it helps: Trains the real movements of daily life — lifting, carrying, squatting — with good mechanics, so everyday tasks feel easier.
- Work through functional movements — squats, step-ups, lunges, and balance — as cleared.
- Add resistance gradually.
Tips:
- Quality of movement first, then load.
Commonly done several times a week.
Low-Impact Recreational Activities
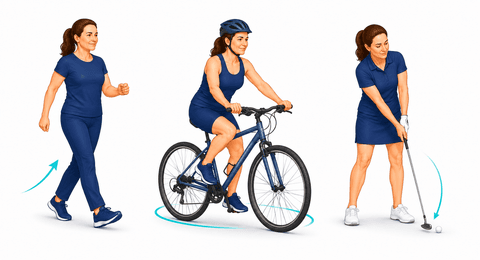
Enjoyable activities that protect your joint.
What it helps: Getting back to the activities you enjoy in ways that are kind to your joints — the whole point of building this strength.
- Choose activities that keep you moving without jarring the joint - walking, cycling and golf are three common ones.
- Start with a short session and add time before you add intensity.
- Spread them across the week rather than doing everything in one day.
- Keep the effort at a level where you could still hold a conversation.
Tips:
- The picture shows three examples, not a list to work through - the best activity is the one you will keep doing.
- A little stiffness the next day is usual; a flare that lingers means the session was too long, not that the activity was wrong.
- Your surgeon or therapist can say when each activity is a reasonable one to add.
Commonly done as you like.
Long-Term Recovery
Months 6–12
Walking Program
Short, frequent walks build endurance and confidence.
What it helps: Comfortable, frequent walking keeps the joints loose, builds your stamina, and rebuilds confidence on your feet. Little and often beats long and tiring.
- Take short walks at a comfortable pace.
- Increase your distance gradually as you feel able.
Tips:
- Use your assistive device as directed.
Commonly done throughout the day.
Cycling
Low-impact endurance and motion.
What it helps: Low-impact endurance that keeps the joints moving smoothly while you build fitness — easy on the body, good for the long run.
- Set the saddle so your knee stays slightly bent at the bottom of the pedal stroke.
- Begin with light resistance on flat ground, pedalling smooth, full circles.
- Build the time you ride before you build the resistance or the hills.
Tips:
- Many people start on a stationary bike and move outdoors, as drawn here, once balance and confidence are back. The pedalling is the same either way.
- A saddle set too low is the usual reason a hip or knee feels cramped while riding.
- Your surgeon can say when getting onto a road bike is reasonable for you.
Commonly done as able.
Swimming
Low-impact, full-body conditioning.
What it helps: Full-body conditioning with the water carrying your weight, so your muscles work hard with almost no load on the joints.
- Wait until any wound is fully healed and you have been cleared to swim.
- Start with a few easy lengths, resting between them.
- Build the distance gradually across sessions rather than within one.
Tips:
- The picture shows front crawl. Which stroke suits you depends on which joint was operated on, and your care team can say which to begin with.
- The water carries most of your weight, so a session can feel easier than it was - judge it by how you feel the next day.
- Walking in chest-deep water is a gentler place to start than swimming lengths.
Commonly done as able.
Strength Training
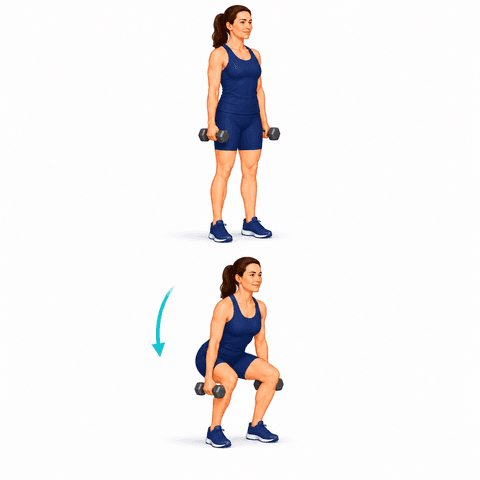
Maintains and builds long-term strength.
What it helps: Builds and maintains long-term strength to keep you active, resilient, and independent.
- Work the major muscle groups two or three times a week, leaving a day between sessions.
- Use a weight you can lift with good form for the whole set - the last repetition should feel hard, not impossible.
- Lower slowly. The controlled way down is where much of the benefit sits.
- Add a little weight only once the current one feels comfortable.
Tips:
- The dumbbell squat shown is one example. Which exercises suit you depends on the joint you are recovering from, and your program will say.
- Breathe out on the effort rather than holding your breath.
- Muscle soreness a day or two later is expected. Pain in the joint itself while you lift is a sign to lighten the weight.
Commonly done a few times a week.
Core Strengthening
Supports posture and overall stability.
What it helps: Builds the core that holds your trunk steady, supporting your posture, your back, and everything you do on your feet.
- Lie on your back with your knees bent, feet flat and arms resting at your sides.
- Gently tighten your stomach muscles, as though bracing.
- Lift your hips until your body makes a straight line from shoulders to knees.
- Hold for a few seconds, then lower slowly.
Tips:
- Push through your heels and let your shoulders stay resting on the floor.
- Breathe normally through the hold rather than holding your breath.
- The bridge shown here is one of several ways to work the core - your therapist may give you others.
Commonly done a few times a week.
Progressive Planks
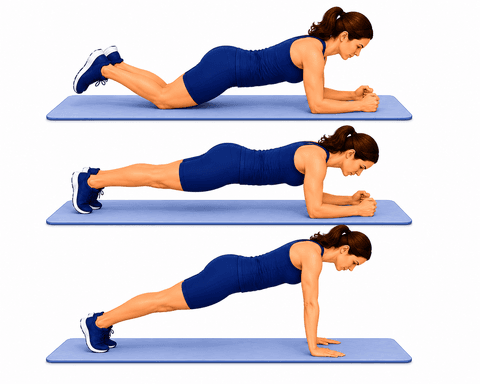
Builds whole-core endurance, progressing from easier to harder holds.
What it helps: Builds whole-core endurance from easier to harder holds — a strong core supports your spine and everything you lift and carry.
- Start with a plank on knees and forearms, body in a straight line, core braced.
- Hold for a comfortable time, keeping your back from sagging.
- Progress to a full plank and longer holds as you get stronger.
Tips:
- Never let your low back sag — drop to your knees first.
- Build time gradually.
Commonly done as hold 15–45s sets of 2–3 reps, most days.
Flexibility Exercises
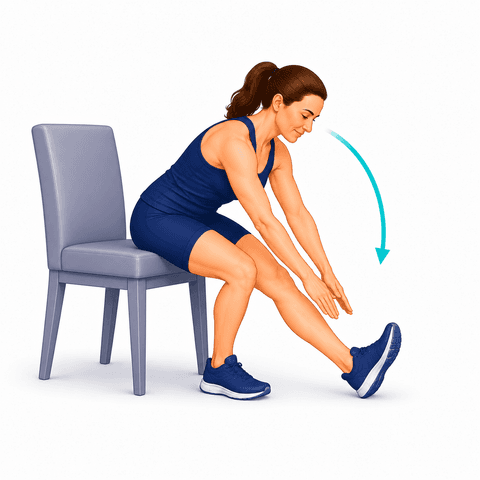
Maintains a comfortable range of motion.
What it helps: Keeps your joints and muscles moving through a comfortable range, so you stay supple and move with ease.
- Sit tall on a chair and slide one leg forward, heel on the floor and toes up.
- Hinge forward from the hips and reach gently toward that foot until you feel a stretch behind the thigh.
- Hold for around 30 seconds, breathing normally, then ease back.
- Repeat on the other side.
Tips:
- A stretch should feel like a long pull, never a pinch - and never bounce into it.
- Muscles stretch more easily when they are warm, so after a walk is a good time.
- The seated hamstring stretch drawn here is one example; your program may include stretches for other areas too.
Commonly done most days.
Balance Training
Ongoing balance work for steady movement.
What it helps: Sharpens your steadiness and reactions so you move with confidence and lower your risk of a fall — protecting the progress you've made.
- Stand with your feet hip-width apart on a soft surface such as a balance pad, with something solid within reach.
- Let your arms come out to the sides and settle over your midline - weight even, hips level.
- Hold steady for up to a minute, then step off and rest.
- As it gets easier, bring your feet closer together or close your eyes briefly.
Tips:
- A firm cushion or a folded towel works if you do not have a pad.
- Stand near a counter or a wall so there is always something to reach for.
- Some wobble is the exercise working, not a sign you are doing it wrong.
Commonly done a few times a week.
Gradual Return to Sport
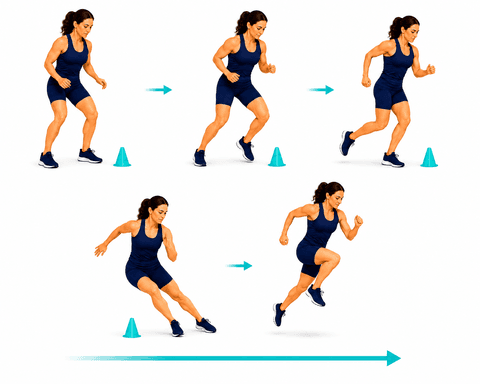
A staged return to higher-impact sport, once strength and control are ready.
What it helps: A staged return to higher-impact sport once strength and control are ready — confidence built step by step.
- With your surgeon's clearance, rebuild sport-specific strength and conditioning first.
- Reintroduce your sport in stages — skills, then practice, then full play.
- Progress only as control and comfort allow.
Tips:
- Do not rush impact or twisting sports.
- Confidence and control matter as much as time.
Commonly done per your surgeon's clearance.
What to expect in recovery
The full recovery guide for this procedure: Lateral Lumbar Interbody Fusion (LLIF / XLIF / OLIF) recovery.
Recovery reading
Browse all exercise guides · Condition guides · Recovery education library
Are you a clinician? See how orthopedic practices use JointBooklet.
These are general exercise guides, not a personal prescription. The repetitions and frequency shown are what's commonly used — your own surgeon or therapist may advise something different, and their guidance comes first.