Thumb CMC Arthroplasty (LRTI / Suspensionplasty) — Complete Exercise Program
Looking for a shorter starting point? The Thumb CMC Arthroplasty (LRTI / Suspensionplasty) starter guide covers the first 8 exercises on a printable sheet.
A phase-by-phase exercise program used in recovery for thumb cmc arthroplasty (lrti / suspensionplasty). Each movement includes what it's working on and how it's typically performed. Your own surgeon's or therapist's guidance always comes first.
Protected Healing
Weeks 0–4
Hand & Wrist Elevation and Swelling Control
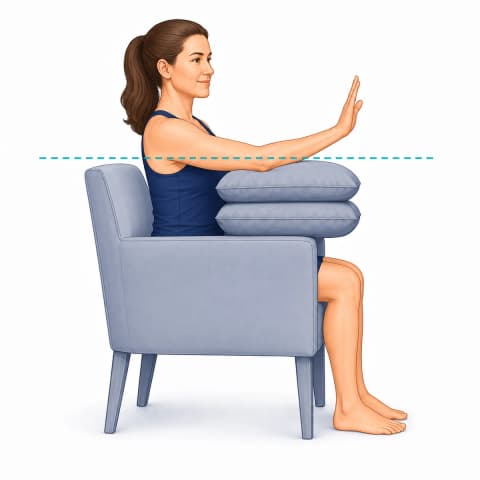
Keeping the hand above heart level and pumping the fingers — the most important thing you do in the first fortnight.
What it helps: Controls the swelling that is the main cause of stiffness after hand and wrist surgery. A swollen hand cannot make a full fist, and fingers left stiff in the first weeks are much harder to free later than the wrist itself is.
- Rest the hand higher than your heart. Sitting, prop the whole forearm on a stack of cushions so the hand sits above chest level.
- Standing, rest it on the opposite shoulder; lying down, support the whole forearm on pillows.
- With the hand up, slowly make a loose fist and open it fully, spreading the fingers.
- Repeat the slow fist-and-open several times, then let the hand rest in the raised position.
- Come back to it regularly through the day rather than doing one long session.
Tips:
- Above the heart is the part that matters. A hand resting on your lap or in a sling at waist height is not elevated, and this is the commonest reason swelling does not settle.
- The fist-and-open is a pump: muscles squeezing push fluid back up the arm. Elevation alone works, but elevation with movement works far better.
- A hand that is puffy and stiff first thing in the morning usually means it spent the night down; support it on pillows in bed.
Commonly done as every hour while awake sets of 10 slow fists, daily.
Finger Range of Motion
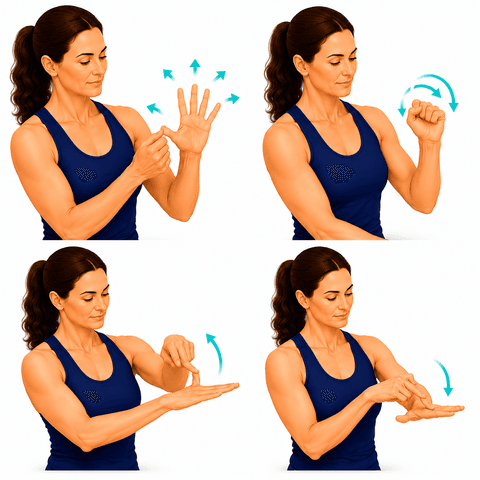
Gentle bending and straightening to keep the finger joints moving.
What it helps: Keeps the finger joints moving through their full range — preserving the bend and straighten you need to grip, pinch, and use your hands for everything.
- Open the hand wide, fingers straight.
- Make a full fist, then open again.
- Bend each finger one at a time toward the palm, then straighten.
Tips:
- Smooth, comfortable motion through the whole range.
- Do it often through the day, especially when the hand feels stiff.
Commonly done as 2–3 sets of 10, daily (several times).
Elbow Range of Motion
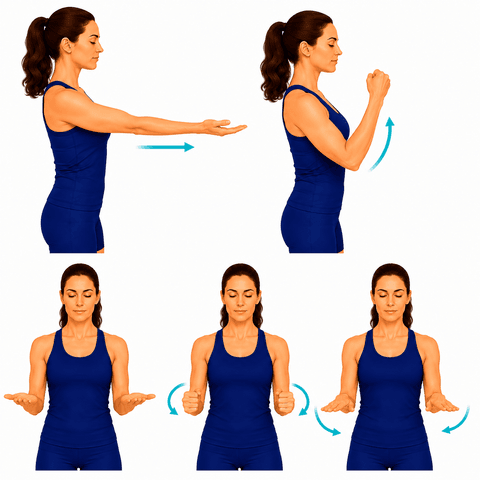
Gentle bending, straightening, and forearm turning to keep the elbow moving freely.
What it helps: Keeps the elbow and forearm moving through their full range — preserving the bend, straighten, and rotation you use for everyday tasks.
- Bend the elbow to bring your hand toward your shoulder, then slowly straighten it all the way.
- With the elbow tucked at your side and bent 90°, turn your palm up, then down.
- Move smoothly through comfortable range; don't force the ends.
Tips:
- Keep the upper arm still — the movement is at the elbow and forearm.
- Sore is okay; sharp is a sign to ease back.
Commonly done as 2–3 sets of 10 each, daily.
Wrist Range of Motion
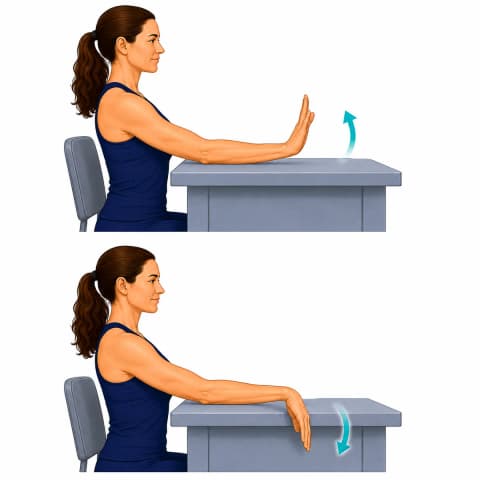
Gentle bending and side-to-side motion to keep the wrist moving freely.
What it helps: Keeps the wrist moving through its full range — preserving the bend, straighten, and side-to-side motion you use for everyday hand tasks.
- Rest your forearm on a table with your hand just past the edge, hand open and relaxed.
- Bend the wrist up so the back of the hand rises, then down so the fingers drop, through a comfortable range.
- Then move the hand side to side — toward the thumb, then toward the little finger.
- Finally make slow circles.
Tips:
- Smooth, comfortable motion — don't force the ends.
- Keep the forearm supported so only the wrist moves.
- No weight for this one. It is about movement, not strength — that is what separates it from wrist curls.
Commonly done as 2–3 sets of 10 each, daily.
Gentle Neck Isometrics
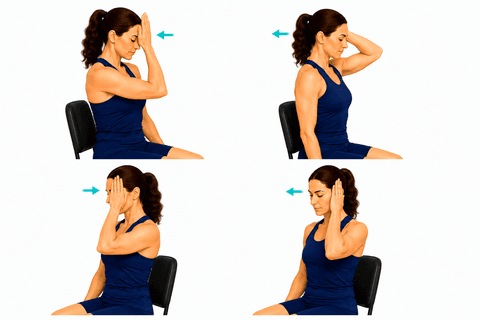
A steady, held press against your own hand — strengthens the neck with no movement.
What it helps: Strengthens the deep muscles that support and steady your neck without moving it — a safe, comfortable way to build the support that eases neck pain.
- Sit tall with a gentle chin-tuck. Place your palm on your forehead.
- Press your head lightly into your hand and your hand back into your head — a steady, comfortable push with NO movement of the neck.
- Hold, relax, and repeat. Do the same with the hand on the back of the head, then each side.
Tips:
- Light pressure — about 20–30% effort. This is not a strength test.
- No actual neck movement: the head stays still while the muscles work.
- Keep the gentle chin-tuck throughout.
Commonly done as 5 each direction sets of Hold 5–10 seconds, daily.
Walking Program
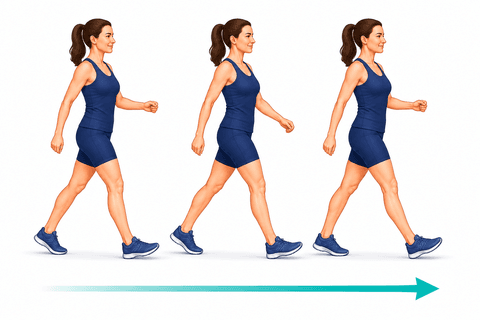
Short, frequent walks build endurance and confidence.
What it helps: Comfortable, frequent walking keeps the joints loose, builds your stamina, and rebuilds confidence on your feet. Little and often beats long and tiring.
- Take short walks at a comfortable pace.
- Increase your distance gradually as you feel able.
Tips:
- Use your assistive device as directed.
Commonly done throughout the day.
Thumb Motion
Weeks 4–8
Thumb Range of Motion

Gentle thumb movements that keep the base of the thumb mobile.
What it helps: Keeps the thumb's wide range — reaching, pinching, and opposing to the fingers — which is behind nearly every grip and pinch task the hand does.
- Move the thumb out away from the palm, then back.
- Touch the thumb tip to each fingertip in turn (opposition).
- Make gentle circles with the thumb. Keep it comfortable.
Tips:
- Smooth, pain-free motion.
- Opposition (thumb to fingertips) is the key everyday motion to keep.
Commonly done as 2–3 sets of 8–10 each, daily.
Scar Massage & Desensitisation
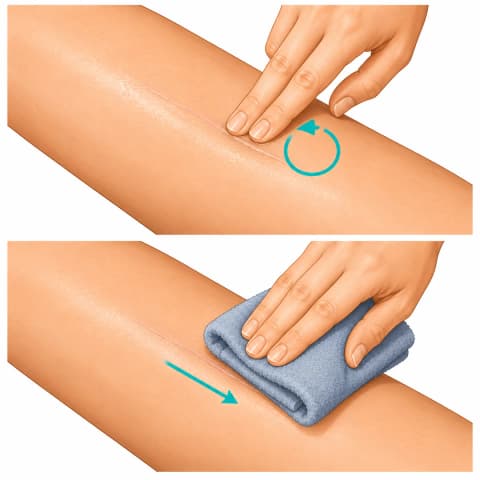
Firm massage over a healed scar, and getting the skin used to being touched again.
What it helps: Keeps the scar soft and mobile rather than tethered to the tissue underneath, and settles the hypersensitivity that makes a healed scar uncomfortable to knock or lean on. It is also what most helps the deep soreness in the heels of the palm after a carpal tunnel release.
- Wait until the wound is fully closed and any stitches are out — usually around two to three weeks. Check with your care team if unsure.
- Put a little unscented moisturiser or plain cream on the scar.
- Press firmly with a fingertip and move in small circles along and across the scar, firm enough to move the skin over the tissue beneath rather than sliding over the surface.
- Then rub different textures over the area — a towel, a soft cloth, clothing — for a minute or two, building from soft to coarser as it becomes tolerable.
Tips:
- Firm enough to move the skin is the point. Light stroking feels pleasant and does very little.
- It will feel odd and slightly unpleasant at first, and tenderness settling over weeks is the sign it is working.
- A few short sessions daily beats one long one. Most people do it while watching television.
Commonly done as 2–3 sets of 3–5 minutes, daily.
Thumb & Wrist Stretch

A gentle stretch for the thumb-side tendons of the wrist.
What it helps: Eases tension in the thumb-side wrist tendons — gently loosening the tight, irritated tendons that limit thumb and wrist use.
- Hold the arm out, thumb up. Gently bend the wrist downward and toward the little-finger side until you feel a mild stretch along the thumb side of the wrist.
- Hold gently; keep it comfortable.
- You can tuck the thumb lightly into the palm first for a touch more — but never force it.
Tips:
- A gentle, mild stretch only — thumb-side tendons are easily over-stretched.
- Ease off if it sharpens.
Commonly done as 3 sets of Hold 15–20 sec, daily.
Finger Range of Motion
Gentle bending and straightening to keep the finger joints moving.
What it helps: Keeps the finger joints moving through their full range — preserving the bend and straighten you need to grip, pinch, and use your hands for everything.
- Open the hand wide, fingers straight.
- Make a full fist, then open again.
- Bend each finger one at a time toward the palm, then straighten.
Tips:
- Smooth, comfortable motion through the whole range.
- Do it often through the day, especially when the hand feels stiff.
Commonly done as 2–3 sets of 10, daily (several times).
Wrist Range of Motion
Gentle bending and side-to-side motion to keep the wrist moving freely.
What it helps: Keeps the wrist moving through its full range — preserving the bend, straighten, and side-to-side motion you use for everyday hand tasks.
- Rest your forearm on a table with your hand just past the edge, hand open and relaxed.
- Bend the wrist up so the back of the hand rises, then down so the fingers drop, through a comfortable range.
- Then move the hand side to side — toward the thumb, then toward the little finger.
- Finally make slow circles.
Tips:
- Smooth, comfortable motion — don't force the ends.
- Keep the forearm supported so only the wrist moves.
- No weight for this one. It is about movement, not strength — that is what separates it from wrist curls.
Commonly done as 2–3 sets of 10 each, daily.
Walking Program
Short, frequent walks build endurance and confidence.
What it helps: Comfortable, frequent walking keeps the joints loose, builds your stamina, and rebuilds confidence on your feet. Little and often beats long and tiring.
- Take short walks at a comfortable pace.
- Increase your distance gradually as you feel able.
Tips:
- Use your assistive device as directed.
Commonly done throughout the day.
Pinch Strengthening
Months 2–4
Thumb Strengthening

Builds pinch and thumb strength with putty or a soft ball.
What it helps: Builds the pinch and thumb strength behind opening jars, turning keys, and gripping — and supports the base of the thumb so it carries pinch loads more comfortably.
- Pinch therapy putty or a soft ball between the thumb and the side of the index finger; hold, then release.
- Pinch between the thumb tip and each fingertip in turn.
- Press the thumb into the putty and push, then relax.
Tips:
- Comfortable effort — stop short of sharp pain at the base of the thumb.
- Full pinch, full release.
Commonly done as 2 sets of 10, most days.
Hand Putty Exercises
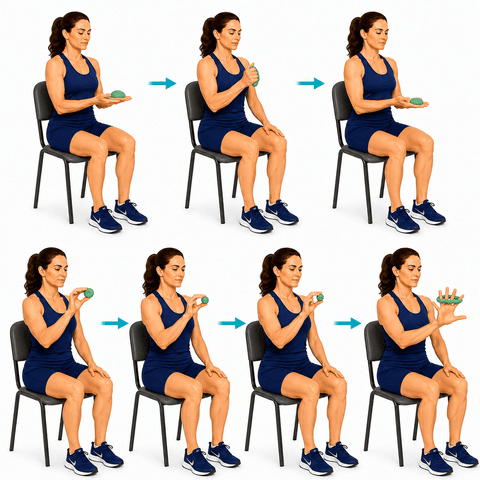
All-around hand strengthening with therapy putty — grip, pinch, and spread.
What it helps: Builds all-around hand and finger strength — grip, pinch, and the muscles that spread the fingers — the foundation of strong, capable hands for daily tasks.
- Squeeze the putty in a full fist, then release.
- Pinch the putty between the thumb and each fingertip in turn.
- Press the putty flat and dig individual fingers in; spread the fingers against a loop of putty.
Tips:
- Comfortable effort; full squeeze and full release.
- Putty comes in firmnesses — start soft and progress as you get stronger.
Commonly done as 2 sets of 10 each, most days.
Grip Strengthening
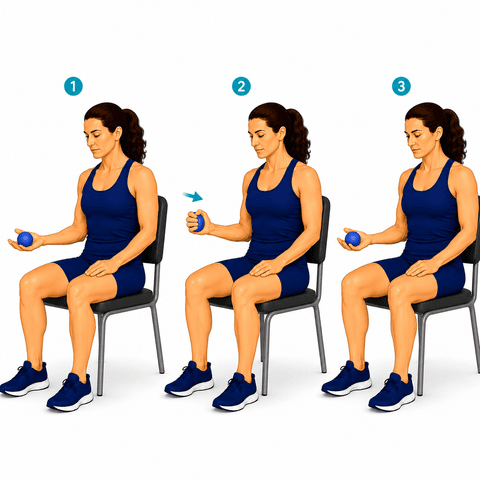
Builds hand and forearm grip strength with a ball or putty.
What it helps: Builds the grip and forearm strength behind almost every hand task — and supports the tendons at the elbow that grip relies on.
- Hold a soft ball or therapy putty in your hand.
- Squeeze firmly and hold a few seconds, then relax fully.
- Work through comfortable effort; stop short of sharp pain.
Tips:
- Full squeeze, full relax — both matter.
- Grip work loads the elbow tendons, so build it gradually if you have tennis or golfer's elbow.
Commonly done as 2–3 sets of 10–15, most days.
Thumb Range of Motion
Gentle thumb movements that keep the base of the thumb mobile.
What it helps: Keeps the thumb's wide range — reaching, pinching, and opposing to the fingers — which is behind nearly every grip and pinch task the hand does.
- Move the thumb out away from the palm, then back.
- Touch the thumb tip to each fingertip in turn (opposition).
- Make gentle circles with the thumb. Keep it comfortable.
Tips:
- Smooth, pain-free motion.
- Opposition (thumb to fingertips) is the key everyday motion to keep.
Commonly done as 2–3 sets of 8–10 each, daily.
Scar Massage & Desensitisation
Firm massage over a healed scar, and getting the skin used to being touched again.
What it helps: Keeps the scar soft and mobile rather than tethered to the tissue underneath, and settles the hypersensitivity that makes a healed scar uncomfortable to knock or lean on. It is also what most helps the deep soreness in the heels of the palm after a carpal tunnel release.
- Wait until the wound is fully closed and any stitches are out — usually around two to three weeks. Check with your care team if unsure.
- Put a little unscented moisturiser or plain cream on the scar.
- Press firmly with a fingertip and move in small circles along and across the scar, firm enough to move the skin over the tissue beneath rather than sliding over the surface.
- Then rub different textures over the area — a towel, a soft cloth, clothing — for a minute or two, building from soft to coarser as it becomes tolerable.
Tips:
- Firm enough to move the skin is the point. Light stroking feels pleasant and does very little.
- It will feel odd and slightly unpleasant at first, and tenderness settling over weeks is the sign it is working.
- A few short sessions daily beats one long one. Most people do it while watching television.
Commonly done as 2–3 sets of 3–5 minutes, daily.
Finger Abduction & Adduction
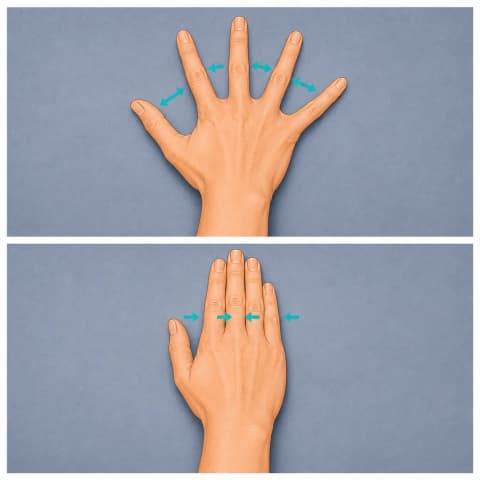
Spreading and squeezing the fingers — training the small hand muscles the ulnar nerve supplies.
What it helps: Targets the small muscles between the fingers, which are supplied by the ulnar nerve and are the first to waste when it is compressed. They are what allow fine, coordinated hand use — holding cards, turning a key, gripping without the fingers splaying — and they recover only if they are specifically trained.
- Rest your hand flat on a table, palm down, fingers straight.
- Spread the fingers as wide apart as you can, then bring them back together tightly.
- Next, place a folded piece of paper between two fingers and squeeze to hold it while you gently try to pull it away with the other hand.
- Work through each gap between the fingers in turn.
Tips:
- The movement is small and the muscles are small — this is about control and endurance rather than force.
- Doing it with the hand flat on a table stops the bigger forearm muscles taking over.
- If the muscles are weak these will feel almost impossible at first. That is the point of doing them.
Commonly done as 2–3 sets of 10 each way, daily.
Advanced Strengthening
Months 4–8
Thumb Strengthening
Builds pinch and thumb strength with putty or a soft ball.
What it helps: Builds the pinch and thumb strength behind opening jars, turning keys, and gripping — and supports the base of the thumb so it carries pinch loads more comfortably.
- Pinch therapy putty or a soft ball between the thumb and the side of the index finger; hold, then release.
- Pinch between the thumb tip and each fingertip in turn.
- Press the thumb into the putty and push, then relax.
Tips:
- Comfortable effort — stop short of sharp pain at the base of the thumb.
- Full pinch, full release.
Commonly done as 2 sets of 10, most days.
Grip Strengthening
Builds hand and forearm grip strength with a ball or putty.
What it helps: Builds the grip and forearm strength behind almost every hand task — and supports the tendons at the elbow that grip relies on.
- Hold a soft ball or therapy putty in your hand.
- Squeeze firmly and hold a few seconds, then relax fully.
- Work through comfortable effort; stop short of sharp pain.
Tips:
- Full squeeze, full relax — both matter.
- Grip work loads the elbow tendons, so build it gradually if you have tennis or golfer's elbow.
Commonly done as 2–3 sets of 10–15, most days.
Hand Putty Exercises
All-around hand strengthening with therapy putty — grip, pinch, and spread.
What it helps: Builds all-around hand and finger strength — grip, pinch, and the muscles that spread the fingers — the foundation of strong, capable hands for daily tasks.
- Squeeze the putty in a full fist, then release.
- Pinch the putty between the thumb and each fingertip in turn.
- Press the putty flat and dig individual fingers in; spread the fingers against a loop of putty.
Tips:
- Comfortable effort; full squeeze and full release.
- Putty comes in firmnesses — start soft and progress as you get stronger.
Commonly done as 2 sets of 10 each, most days.
Wrist Curls
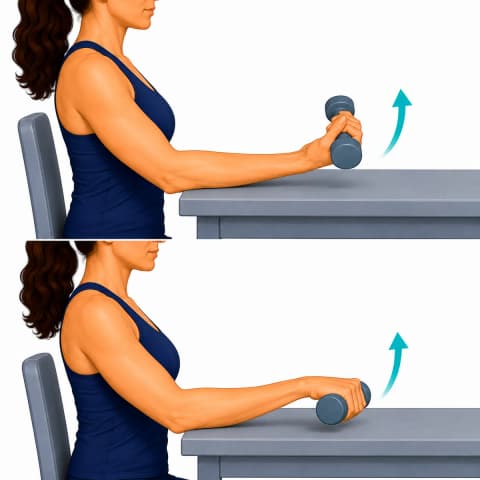
Strengthens the forearm muscles in both directions.
What it helps: Builds balanced forearm strength in both directions — the everyday strength behind a comfortable, capable wrist and grip.
- Rest your forearm on a table with your hand just past the edge, holding a light weight.
- Palm up: curl your wrist upward, then lower it slowly.
- Turn your forearm over so the palm faces down, then lift the back of your hand upward and lower it slowly.
- Move smoothly through a comfortable range.
Tips:
- Light weight, controlled motion.
- Your forearm stays resting on the table — only the wrist moves.
- Build the forearm in both directions for balance.
Commonly done as 2–3 sets of 12–15 each, most days.
Progressive Strengthening
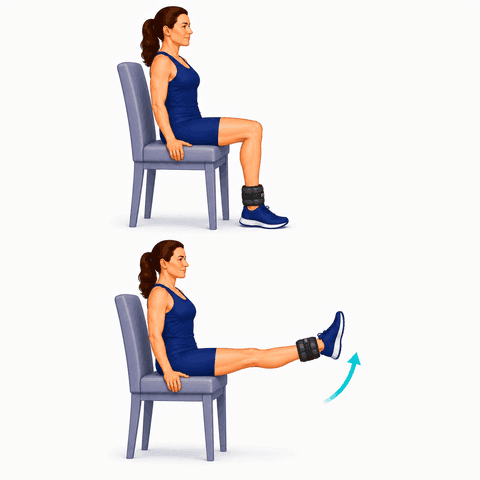
Gradually increases strength as you recover.
What it helps: Gradually raises the challenge as you get stronger, so your body keeps adapting and improving rather than plateauing.
- Begin with no added weight and get the movement smooth and comfortable first.
- When a set starts to feel easy, add a light load - the ankle cuff shown here, a dumbbell or a band.
- Sit tall, straighten the knee against the weight, hold briefly, then lower slowly.
- Step the load up in small amounts rather than in jumps.
Tips:
- Progress one thing at a time - more weight or more repetitions, not both in the same week.
- If your form slips before the set ends, the load is too heavy.
- The ankle-weight knee extension is the example drawn. The same rule of small steps applies to whichever exercises your program includes.
Commonly done as directed.
Stationary Bike
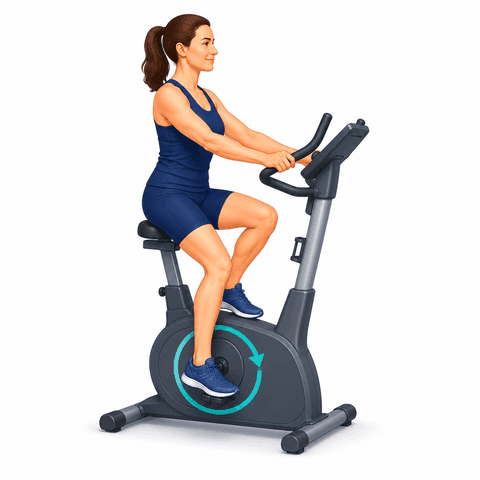
Builds motion and endurance with low impact.
What it helps: Keeps the joints moving and nourished while you build endurance — all with no pounding. One of the gentlest ways to stay active when a joint is sore.
- Set the seat so pedaling is comfortable.
- Pedal at an easy pace.
- Increase your time gradually.
Commonly done as directed.
Long-Term Recovery
Months 8–18
Grip Strengthening
Builds hand and forearm grip strength with a ball or putty.
What it helps: Builds the grip and forearm strength behind almost every hand task — and supports the tendons at the elbow that grip relies on.
- Hold a soft ball or therapy putty in your hand.
- Squeeze firmly and hold a few seconds, then relax fully.
- Work through comfortable effort; stop short of sharp pain.
Tips:
- Full squeeze, full relax — both matter.
- Grip work loads the elbow tendons, so build it gradually if you have tennis or golfer's elbow.
Commonly done as 2–3 sets of 10–15, most days.
Functional Strength Training
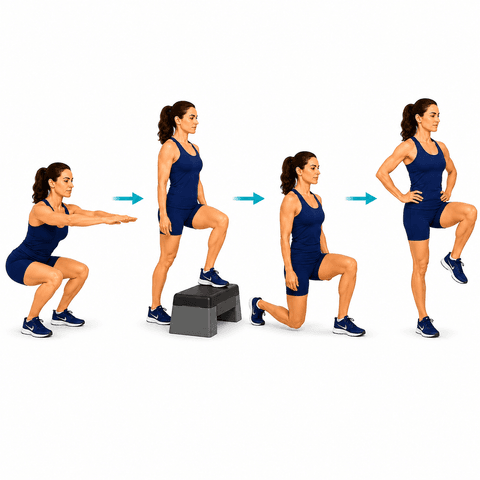
Task-based strengthening that rebuilds the movements of daily life and activity.
What it helps: Trains the real movements of daily life — lifting, carrying, squatting — with good mechanics, so everyday tasks feel easier.
- Work through functional movements — squats, step-ups, lunges, and balance — as cleared.
- Add resistance gradually.
Tips:
- Quality of movement first, then load.
Commonly done several times a week.
Thumb Strengthening
Builds pinch and thumb strength with putty or a soft ball.
What it helps: Builds the pinch and thumb strength behind opening jars, turning keys, and gripping — and supports the base of the thumb so it carries pinch loads more comfortably.
- Pinch therapy putty or a soft ball between the thumb and the side of the index finger; hold, then release.
- Pinch between the thumb tip and each fingertip in turn.
- Press the thumb into the putty and push, then relax.
Tips:
- Comfortable effort — stop short of sharp pain at the base of the thumb.
- Full pinch, full release.
Commonly done as 2 sets of 10, most days.
Flexibility Exercises
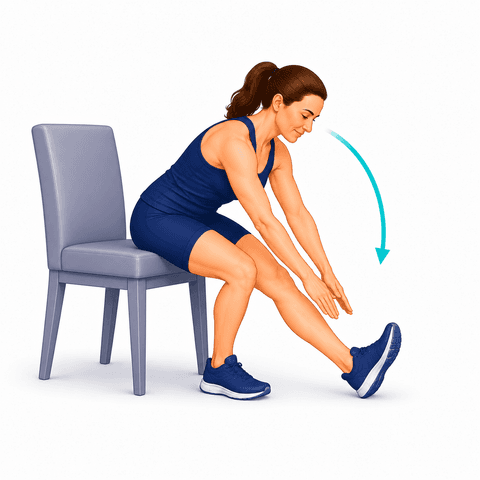
Maintains a comfortable range of motion.
What it helps: Keeps your joints and muscles moving through a comfortable range, so you stay supple and move with ease.
- Sit tall on a chair and slide one leg forward, heel on the floor and toes up.
- Hinge forward from the hips and reach gently toward that foot until you feel a stretch behind the thigh.
- Hold for around 30 seconds, breathing normally, then ease back.
- Repeat on the other side.
Tips:
- A stretch should feel like a long pull, never a pinch - and never bounce into it.
- Muscles stretch more easily when they are warm, so after a walk is a good time.
- The seated hamstring stretch drawn here is one example; your program may include stretches for other areas too.
Commonly done most days.
Walking Program
Short, frequent walks build endurance and confidence.
What it helps: Comfortable, frequent walking keeps the joints loose, builds your stamina, and rebuilds confidence on your feet. Little and often beats long and tiring.
- Take short walks at a comfortable pace.
- Increase your distance gradually as you feel able.
Tips:
- Use your assistive device as directed.
Commonly done throughout the day.
Low-Impact Recreational Activities
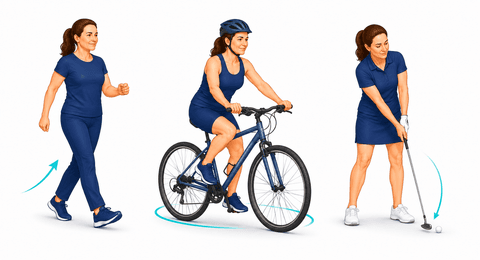
Enjoyable activities that protect your joint.
What it helps: Getting back to the activities you enjoy in ways that are kind to your joints — the whole point of building this strength.
- Choose activities that keep you moving without jarring the joint - walking, cycling and golf are three common ones.
- Start with a short session and add time before you add intensity.
- Spread them across the week rather than doing everything in one day.
- Keep the effort at a level where you could still hold a conversation.
Tips:
- The picture shows three examples, not a list to work through - the best activity is the one you will keep doing.
- A little stiffness the next day is usual; a flare that lingers means the session was too long, not that the activity was wrong.
- Your surgeon or therapist can say when each activity is a reasonable one to add.
Commonly done as you like.
What to expect in recovery
The full recovery guide for this procedure: Thumb Joint Reconstruction recovery.
Recovery reading
Browse all exercise guides · Condition guides · Recovery education library
Are you a clinician? See how orthopedic practices use JointBooklet.
These are general exercise guides, not a personal prescription. The repetitions and frequency shown are what's commonly used — your own surgeon or therapist may advise something different, and their guidance comes first.