Hand Putty Exercises
All-around hand strengthening with therapy putty — grip, pinch, and spread.
What it helps
Builds all-around hand and finger strength — grip, pinch, and the muscles that spread the fingers — the foundation of strong, capable hands for daily tasks.
How to do it
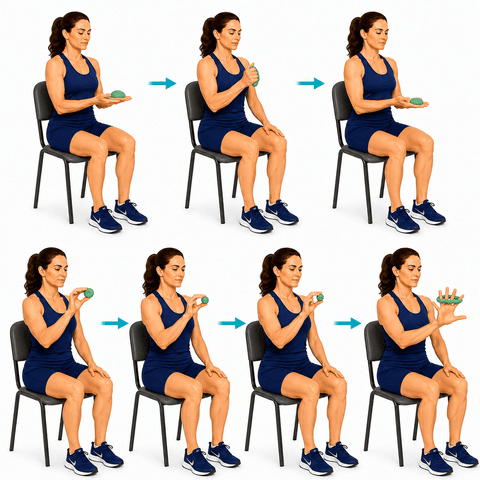
- Squeeze the putty in a full fist, then release.
- Pinch the putty between the thumb and each fingertip in turn.
- Press the putty flat and dig individual fingers in; spread the fingers against a loop of putty.
Tips
- Comfortable effort; full squeeze and full release.
- Putty comes in firmnesses — start soft and progress as you get stronger.
Commonly done as 2 sets of 10 each, most days.
Where this appears in recovery
Hand Putty Exercises is part of 70 recovery programs, most often at the strength building (weeks 6–12), advanced strengthening (months 3–6) and strength & scar (weeks 6–12) stages, among others. Each program shows how it fits alongside the other movements:
- Distal Radius Fracture ORIF exercise guide
- Distal Radius Fracture ORIF exercise guide
- Dupuytren Fasciectomy exercise guide
- Dupuytren Fasciectomy exercise guide
- PIP Joint Arthroplasty exercise guide
- PIP Joint Arthroplasty exercise guide
- Needle Aponeurotomy (Dupuytren) exercise guide
- Needle Aponeurotomy (Dupuytren) exercise guide
- Proximal Row Carpectomy exercise guide
- Proximal Row Carpectomy exercise guide
- Partial Wrist Fusion (Four-Corner Fusion) exercise guide
- Partial Wrist Fusion (Four-Corner Fusion) exercise guide
- …and 58 more
All exercise guides · Condition guides · Recovery education
These are general exercise guides, not a personal prescription. The repetitions and frequency shown are what's commonly used — your own surgeon or therapist may advise something different, and their guidance comes first.