Cubital Tunnel Syndrome — Complete Exercise Program
Looking for a shorter starting point? The Cubital Tunnel Syndrome starter guide covers the first 8 exercises on a printable sheet.
A phase-by-phase exercise program used in recovery for cubital tunnel syndrome. Each movement includes what it's working on and how it's typically performed. Your own surgeon's or therapist's guidance always comes first.
Phase 1
Arm Nerve Glides
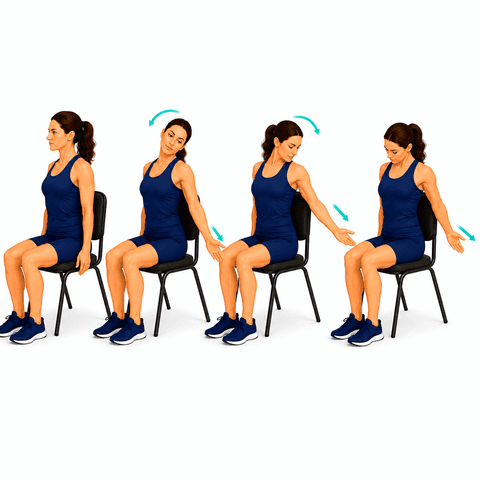
Gentle movements that help a neck nerve slide freely down the arm.
What it helps: Helps an irritated neck nerve glide freely down the arm, which can ease arm pain, tingling, or numbness. Gentle, repeated motion — never forced.
- Sit or stand tall. Start with the affected arm out to the side, elbow bent, palm up.
- Slowly straighten the elbow and ease the arm out while gently tilting your head AWAY — then return as you tilt the head back toward that side.
- Move smoothly in and out of the range, like flossing — never holding at the end or pushing into symptoms.
Tips:
- Gentle is the rule — ease back the moment it provokes sharp or shooting arm symptoms.
- Small, smooth, repeated movements — not a hard stretch.
- Stop and check with your care team if symptoms steadily worsen.
Commonly done as 2–3 times sets of 10–15 slow glides, daily.
Elbow Range of Motion
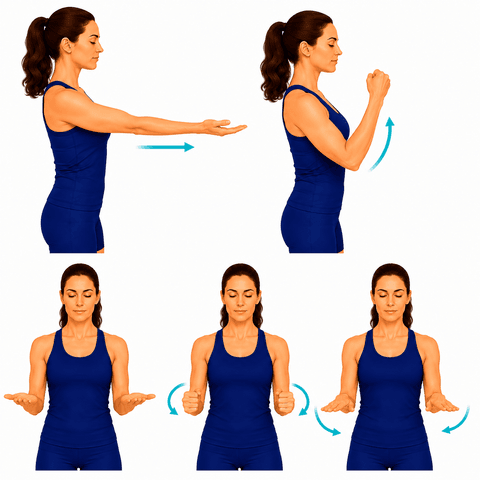
Gentle bending, straightening, and forearm turning to keep the elbow moving freely.
What it helps: Keeps the elbow and forearm moving through their full range — preserving the bend, straighten, and rotation you use for everyday tasks.
- Bend the elbow to bring your hand toward your shoulder, then slowly straighten it all the way.
- With the elbow tucked at your side and bent 90°, turn your palm up, then down.
- Move smoothly through comfortable range; don't force the ends.
Tips:
- Keep the upper arm still — the movement is at the elbow and forearm.
- Sore is okay; sharp is a sign to ease back.
Commonly done as 2–3 sets of 10 each, daily.
Posture Training
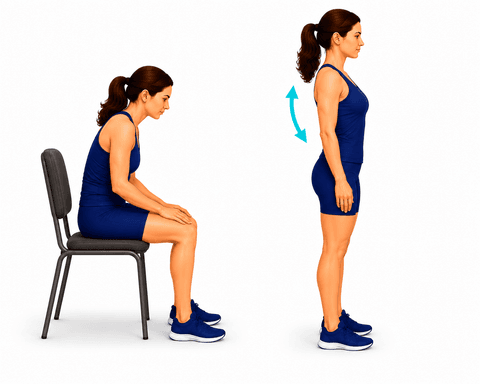
Trains a neutral spine for sitting, standing, and lifting safely.
What it helps: Trains a neutral, balanced spine for sitting, standing, and lifting — good posture takes strain off the back all day long.
- Sit or stand tall, stacking ears over shoulders over hips.
- Gently draw your shoulder blades down and back.
- Hold a tall, relaxed neutral position; reset whenever you slouch.
Tips:
- Set reminders to check your posture during the day.
- A small lumbar roll helps when sitting.
Commonly done throughout the day.
Forearm Stretch (Flexors & Extensors)
Stretches the muscles of the forearm that attach at the elbow.
What it helps: Loosens the forearm muscles that attach at the elbow — easing the tension that pulls on irritated tendons and limits comfortable wrist and grip use.
- Straighten the arm in front of you, palm down. With the other hand, gently bend the wrist down until you feel a stretch along the top of the forearm (extensors).
- Then turn the palm up and gently bend the wrist down to stretch the underside (flexors).
- Hold each gently; keep the elbow straight.
Tips:
- A gentle, steady pull — never sharp.
- Keeping the elbow straight makes the stretch reach the muscles that attach there.
Commonly done as 3 sets of Hold 20–30 sec each, daily.
Walking Program
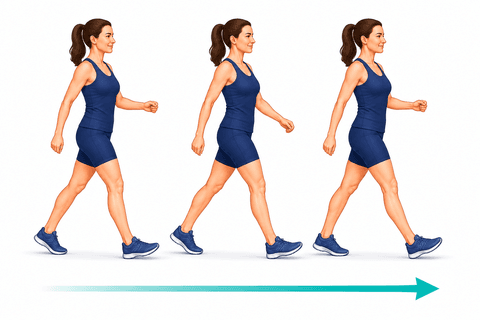
Short, frequent walks build endurance and confidence.
What it helps: Comfortable, frequent walking keeps the joints loose, builds your stamina, and rebuilds confidence on your feet. Little and often beats long and tiring.
- Take short walks at a comfortable pace.
- Increase your distance gradually as you feel able.
Tips:
- Use your assistive device as directed.
Commonly done throughout the day.
Phase 2
Arm Nerve Glides
Gentle movements that help a neck nerve slide freely down the arm.
What it helps: Helps an irritated neck nerve glide freely down the arm, which can ease arm pain, tingling, or numbness. Gentle, repeated motion — never forced.
- Sit or stand tall. Start with the affected arm out to the side, elbow bent, palm up.
- Slowly straighten the elbow and ease the arm out while gently tilting your head AWAY — then return as you tilt the head back toward that side.
- Move smoothly in and out of the range, like flossing — never holding at the end or pushing into symptoms.
Tips:
- Gentle is the rule — ease back the moment it provokes sharp or shooting arm symptoms.
- Small, smooth, repeated movements — not a hard stretch.
- Stop and check with your care team if symptoms steadily worsen.
Commonly done as 2–3 times sets of 10–15 slow glides, daily.
Gentle Nerve Glides

Helps a healing nerve move freely and can ease leg symptoms — gentle, never into sharp pain.
What it helps: Helps a healing nerve slide freely, which can ease leg or arm symptoms. Gentle is the rule — never push into sharp pain.
- Sit tall in a chair.
- Slowly straighten one knee while flexing your foot up, until you feel a light stretch down the leg.
- Bend the knee back down — move in and out smoothly.
Tips:
- Stay in a gentle, pain-free range.
- Stop if it sharply increases leg pain.
Commonly done as 1–2 sets of 10, 1–2 times a day.
Wrist Isometrics
Gentle no-movement holds that calm tendon pain while keeping the muscles active.
What it helps: Loads the forearm tendons gently without movement — a comfortable way to keep them strong and often to ease tendon pain before they're ready for moving resistance.
- Rest the forearm on a table, hand off the edge. For extensors: make a light fist, push the back of the hand up against your other hand — no movement — and hold.
- For flexors: push the palm down against your other hand and hold.
- Use comfortable pressure; the wrist stays still.
Tips:
- No movement happens — you're holding against resistance.
- Start light; isometrics often ease tendon pain, so find a comfortable level.
Commonly done as 1 sets of Hold 20–45 sec ×3–5, daily.
Grip Strengthening

Builds hand and forearm grip strength with a ball or putty.
What it helps: Builds the grip and forearm strength behind almost every hand task — and supports the tendons at the elbow that grip relies on.
- Hold a soft ball or therapy putty in your hand.
- Squeeze firmly and hold a few seconds, then relax fully.
- Work through comfortable effort; stop short of sharp pain.
Tips:
- Full squeeze, full relax — both matter.
- Grip work loads the elbow tendons, so build it gradually if you have tennis or golfer's elbow.
Commonly done as 2–3 sets of 10–15, most days.
Walking Program
Short, frequent walks build endurance and confidence.
What it helps: Comfortable, frequent walking keeps the joints loose, builds your stamina, and rebuilds confidence on your feet. Little and often beats long and tiring.
- Take short walks at a comfortable pace.
- Increase your distance gradually as you feel able.
Tips:
- Use your assistive device as directed.
Commonly done throughout the day.
Phase 3
Arm Nerve Glides
Gentle movements that help a neck nerve slide freely down the arm.
What it helps: Helps an irritated neck nerve glide freely down the arm, which can ease arm pain, tingling, or numbness. Gentle, repeated motion — never forced.
- Sit or stand tall. Start with the affected arm out to the side, elbow bent, palm up.
- Slowly straighten the elbow and ease the arm out while gently tilting your head AWAY — then return as you tilt the head back toward that side.
- Move smoothly in and out of the range, like flossing — never holding at the end or pushing into symptoms.
Tips:
- Gentle is the rule — ease back the moment it provokes sharp or shooting arm symptoms.
- Small, smooth, repeated movements — not a hard stretch.
- Stop and check with your care team if symptoms steadily worsen.
Commonly done as 2–3 times sets of 10–15 slow glides, daily.
Wrist Curls
Strengthens the forearm muscles in both directions.
What it helps: Builds balanced forearm strength in both directions — the everyday strength behind a comfortable, capable wrist and grip.
- Rest the forearm on a table, hand off the edge, holding a light weight.
- Palm up: curl the wrist up, then lower with control (flexion). Palm down: lift the back of the hand up, then lower (extension).
- Move smoothly through comfortable range.
Tips:
- Light weight, controlled motion.
- Build the forearm in both directions for balance.
Commonly done as 2–3 sets of 12–15 each, most days.
Grip Strengthening
Builds hand and forearm grip strength with a ball or putty.
What it helps: Builds the grip and forearm strength behind almost every hand task — and supports the tendons at the elbow that grip relies on.
- Hold a soft ball or therapy putty in your hand.
- Squeeze firmly and hold a few seconds, then relax fully.
- Work through comfortable effort; stop short of sharp pain.
Tips:
- Full squeeze, full relax — both matter.
- Grip work loads the elbow tendons, so build it gradually if you have tennis or golfer's elbow.
Commonly done as 2–3 sets of 10–15, most days.
Forearm Rotation
Strengthens the muscles that turn the palm up and down.
What it helps: Strengthens the muscles that rotate the forearm — the motion behind turning a key, a doorknob, or a screwdriver.
- Tuck the elbow at your side, bent 90°, holding a light weight or a hammer by the handle.
- Slowly rotate the forearm to turn the palm up, then down, through comfortable range.
- Keep the elbow pinned to your side.
Tips:
- Holding a hammer toward the head end adds gentle resistance — slide your grip to adjust.
- Keep the elbow still; only the forearm rotates.
Commonly done as 2–3 sets of 10–12 each way, most days.
Resistance Band Rows
Strengthens the upper back to support posture and the cervical spine.
What it helps: Strengthens the upper back that supports good posture and takes strain off the neck.
- Anchor a resistance band at chest height and hold an end in each hand.
- Pull your elbows back, squeezing your shoulder blades together.
- Return slowly with control.
Tips:
- Keep your neck relaxed and posture tall.
- Lead with the shoulder blades, not the neck.
Commonly done as 2 sets of 10–15, 3–4 times a week.
Phase 4
Wrist Curls
Strengthens the forearm muscles in both directions.
What it helps: Builds balanced forearm strength in both directions — the everyday strength behind a comfortable, capable wrist and grip.
- Rest the forearm on a table, hand off the edge, holding a light weight.
- Palm up: curl the wrist up, then lower with control (flexion). Palm down: lift the back of the hand up, then lower (extension).
- Move smoothly through comfortable range.
Tips:
- Light weight, controlled motion.
- Build the forearm in both directions for balance.
Commonly done as 2–3 sets of 12–15 each, most days.
Grip Strengthening
Builds hand and forearm grip strength with a ball or putty.
What it helps: Builds the grip and forearm strength behind almost every hand task — and supports the tendons at the elbow that grip relies on.
- Hold a soft ball or therapy putty in your hand.
- Squeeze firmly and hold a few seconds, then relax fully.
- Work through comfortable effort; stop short of sharp pain.
Tips:
- Full squeeze, full relax — both matter.
- Grip work loads the elbow tendons, so build it gradually if you have tennis or golfer's elbow.
Commonly done as 2–3 sets of 10–15, most days.
Resistance Band Rows
Strengthens the upper back to support posture and the cervical spine.
What it helps: Strengthens the upper back that supports good posture and takes strain off the neck.
- Anchor a resistance band at chest height and hold an end in each hand.
- Pull your elbows back, squeezing your shoulder blades together.
- Return slowly with control.
Tips:
- Keep your neck relaxed and posture tall.
- Lead with the shoulder blades, not the neck.
Commonly done as 2 sets of 10–15, 3–4 times a week.
Shoulder Blade Squeezes
Strengthens the muscles between the shoulder blades to support upright posture.
What it helps: Strengthens the muscles between the shoulder blades that hold you upright and support good posture.
- Sit or stand tall with arms relaxed.
- Gently squeeze your shoulder blades together and slightly down.
- Hold briefly, then release.
Tips:
- Do not shrug your shoulders up toward your ears.
- Keep it gentle and controlled.
Commonly done as hold 3–5s sets of 10–15, a few times a day.
Low-Impact Recreational Activities
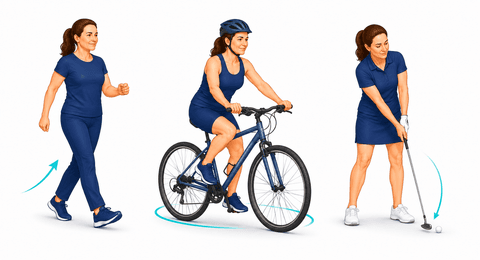
Enjoyable activities that protect your joint.
What it helps: Getting back to the activities you enjoy in ways that are kind to your joints — the whole point of building this strength.
Commonly done as you like.
Phase 5
Wrist Curls
Strengthens the forearm muscles in both directions.
What it helps: Builds balanced forearm strength in both directions — the everyday strength behind a comfortable, capable wrist and grip.
- Rest the forearm on a table, hand off the edge, holding a light weight.
- Palm up: curl the wrist up, then lower with control (flexion). Palm down: lift the back of the hand up, then lower (extension).
- Move smoothly through comfortable range.
Tips:
- Light weight, controlled motion.
- Build the forearm in both directions for balance.
Commonly done as 2–3 sets of 12–15 each, most days.
Grip Strengthening
Builds hand and forearm grip strength with a ball or putty.
What it helps: Builds the grip and forearm strength behind almost every hand task — and supports the tendons at the elbow that grip relies on.
- Hold a soft ball or therapy putty in your hand.
- Squeeze firmly and hold a few seconds, then relax fully.
- Work through comfortable effort; stop short of sharp pain.
Tips:
- Full squeeze, full relax — both matter.
- Grip work loads the elbow tendons, so build it gradually if you have tennis or golfer's elbow.
Commonly done as 2–3 sets of 10–15, most days.
Arm Nerve Glides
Gentle movements that help a neck nerve slide freely down the arm.
What it helps: Helps an irritated neck nerve glide freely down the arm, which can ease arm pain, tingling, or numbness. Gentle, repeated motion — never forced.
- Sit or stand tall. Start with the affected arm out to the side, elbow bent, palm up.
- Slowly straighten the elbow and ease the arm out while gently tilting your head AWAY — then return as you tilt the head back toward that side.
- Move smoothly in and out of the range, like flossing — never holding at the end or pushing into symptoms.
Tips:
- Gentle is the rule — ease back the moment it provokes sharp or shooting arm symptoms.
- Small, smooth, repeated movements — not a hard stretch.
- Stop and check with your care team if symptoms steadily worsen.
Commonly done as 2–3 times sets of 10–15 slow glides, daily.
Walking Program
Short, frequent walks build endurance and confidence.
What it helps: Comfortable, frequent walking keeps the joints loose, builds your stamina, and rebuilds confidence on your feet. Little and often beats long and tiring.
- Take short walks at a comfortable pace.
- Increase your distance gradually as you feel able.
Tips:
- Use your assistive device as directed.
Commonly done throughout the day.
Low-Impact Recreational Activities
Enjoyable activities that protect your joint.
What it helps: Getting back to the activities you enjoy in ways that are kind to your joints — the whole point of building this strength.
Commonly done as you like.
About Cubital Tunnel Syndrome
What the condition is, how it's usually managed, and what to expect — read the Cubital Tunnel Syndrome guide.
Recovery reading
Browse all exercise guides · Condition guides · Recovery education library
These are general exercise guides, not a personal prescription. The repetitions and frequency shown are what's commonly used — your own surgeon or therapist may advise something different, and their guidance comes first.