JointBooklet · jointbooklet.com
Trigger Finger Release Starter Exercise Guide
A short starting program — 8 exercises drawn from the full 20-exercise program. These are the movements most people begin with.
Before you begin. This is general guidance, not a personal prescription. If your surgeon or therapist has given you a different program or different limits, follow theirs.
1. Tendon Gliding (Finger Glides)
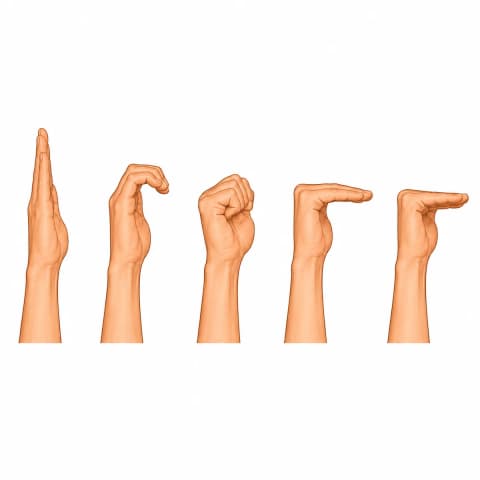
What it helps: Keeps the finger tendons sliding freely through their sheaths and the carpal tunnel — preventing stiffness and catching, and keeping the hand smooth and supple.
How often: 2–3 sets of 5–10 of each, daily.
- Start with fingers straight.
- Bend just the top two knuckles into a "hook," then straighten.
- Make a full fist, then straighten.
- Bend the big knuckles only into a "tabletop," then straighten.
- Make a "straight fist" (fingers curled but knuckles flat). Move slowly through each.
Tip: Move smoothly through the whole sequence.
2. Finger Range of Motion
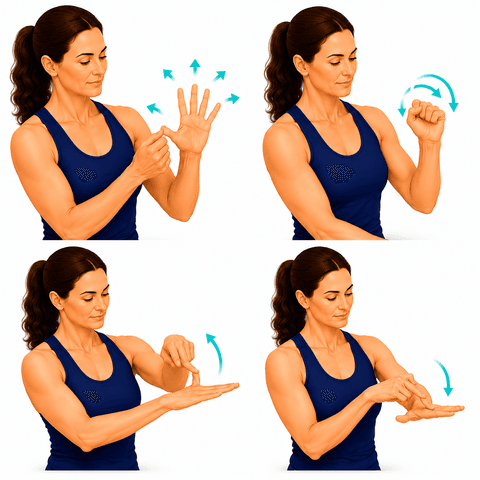
What it helps: Keeps the finger joints moving through their full range — preserving the bend and straighten you need to grip, pinch, and use your hands for everything.
How often: 2–3 sets of 10, daily (several times).
- Open the hand wide, fingers straight.
- Make a full fist, then open again.
- Bend each finger one at a time toward the palm, then straighten.
Tip: Smooth, comfortable motion through the whole range.
3. Blocking Exercises (Isolated Joint Motion)
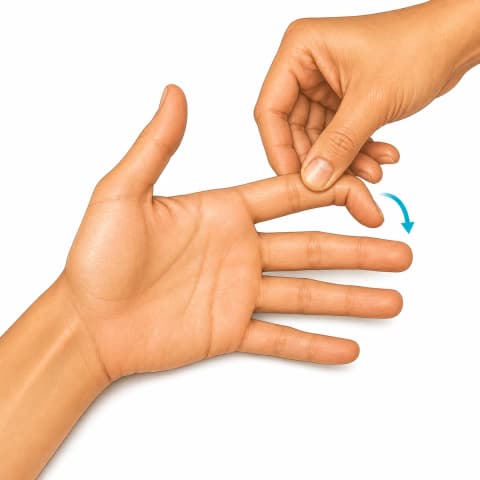
What it helps: Forces a tendon to glide rather than letting the finger move as a single unit, which is how stiffness at one joint gets missed. It is the most reliable way to recover movement at a specific joint after a tendon repair or a finger injury.
How often: 2–3 sets of 10 per joint, daily.
- Rest the injured hand palm-up on a table.
- With the other hand, hold the finger firmly just below the joint you want to move, keeping the joints closer to the palm completely still.
- Now bend and straighten only the free joint beyond where you are holding, slowly and through as much range as it will go.
- Move the holding hand to the next joint along and repeat.
Tip: The point is isolation. If the whole finger is curling as a unit, move your holding hand closer to the joint you are working.
4. Finger & Hand Stretch
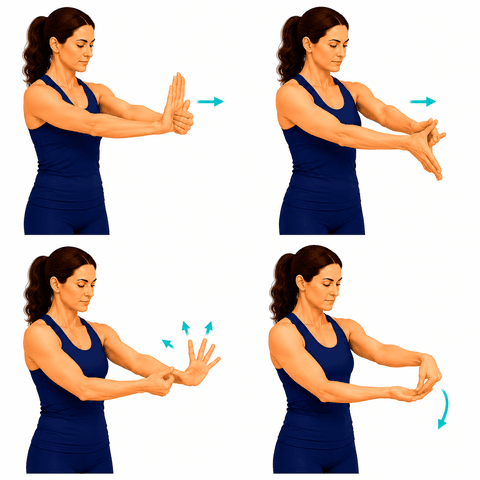
What it helps: Eases stiffness in the finger joints and palm — keeping the hand supple and the fingers moving freely for grip and pinch.
How often: 2–3 sets of Hold 10–15 sec, daily.
- Gently straighten the fingers back with the other hand until you feel a mild stretch in the palm and fingers.
- Spread the fingers wide and hold.
- Gently bend each finger and hold a moment.
Tip: Gentle, mild stretches — never force a stiff or sore joint.
5. Thumb Range of Motion

What it helps: Keeps the thumb's wide range — reaching, pinching, and opposing to the fingers — which is behind nearly every grip and pinch task the hand does.
How often: 2–3 sets of 8–10 each, daily.
- Move the thumb out away from the palm, then back.
- Touch the thumb tip to each fingertip in turn (opposition).
- Make gentle circles with the thumb. Keep it comfortable.
Tip: Smooth, pain-free motion.
6. Gentle Neck Isometrics
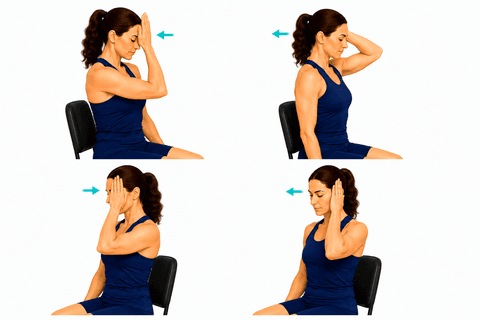
What it helps: Strengthens the deep muscles that support and steady your neck without moving it — a safe, comfortable way to build the support that eases neck pain.
How often: 5 each direction sets of Hold 5–10 seconds, daily.
- Sit tall with a gentle chin-tuck. Place your palm on your forehead.
- Press your head lightly into your hand and your hand back into your head — a steady, comfortable push with NO movement of the neck.
- Hold, relax, and repeat. Do the same with the hand on the back of the head, then each side.
Tip: Light pressure — about 20–30% effort. This is not a strength test.
7. Walking Program
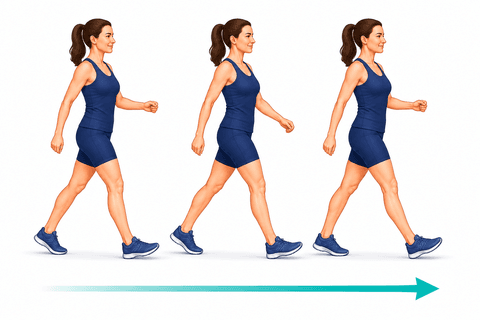
What it helps: Comfortable, frequent walking keeps the joints loose, builds your stamina, and rebuilds confidence on your feet. Little and often beats long and tiring.
How often: throughout the day.
- Take short walks at a comfortable pace.
- Increase your distance gradually as you feel able.
Tip: Use your assistive device as directed.
8. Scar Massage & Desensitisation
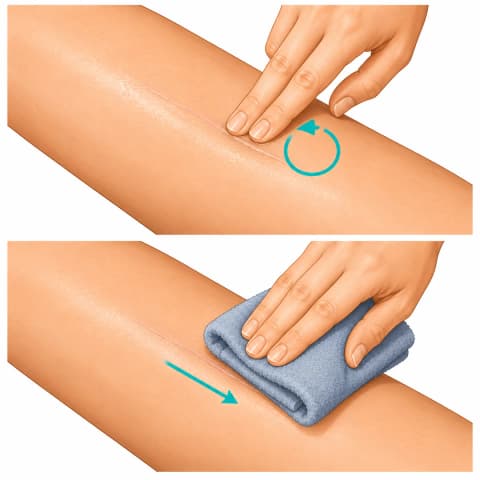
What it helps: Keeps the scar soft and mobile rather than tethered to the tissue underneath, and settles the hypersensitivity that makes a healed scar uncomfortable to knock or lean on. It is also what most helps the deep soreness in the heels of the palm after a carpal tunnel release.
How often: 2–3 sets of 3–5 minutes, daily.
- Wait until the wound is fully closed and any stitches are out — usually around two to three weeks. Check with your care team if unsure.
- Put a little unscented moisturiser or plain cream on the scar.
- Press firmly with a fingertip and move in small circles along and across the scar, firm enough to move the skin over the tissue beneath rather than sliding over the surface.
- Then rub different textures over the area — a towel, a soft cloth, clothing — for a minute or two, building from soft to coarser as it becomes tolerable.
Tip: Firm enough to move the skin is the point. Light stroking feels pleasant and does very little.
See the complete 20-exercise program, phase by phase.
What to expect in recovery
The full recovery guide for this procedure: Trigger Finger Release recovery.
Recovery reading
Browse all exercise guides · Condition guides · Recovery education library
Are you a clinician? See how orthopedic practices use JointBooklet.
Are you a clinician? See how orthopedic practices use JointBooklet.
These are general exercise guides, not a personal prescription. The repetitions and frequency shown are what's commonly used — your own surgeon or therapist may advise something different, and their guidance comes first.