JointBooklet · jointbooklet.com
Carpal Tunnel Syndrome Starter Exercise Guide
A short starting program — 8 exercises drawn from the full 25-exercise program. These are the movements most people begin with.
Before you begin. This is general guidance, not a personal prescription. If your surgeon or therapist has given you a different program or different limits, follow theirs.
1. Median Nerve Glides
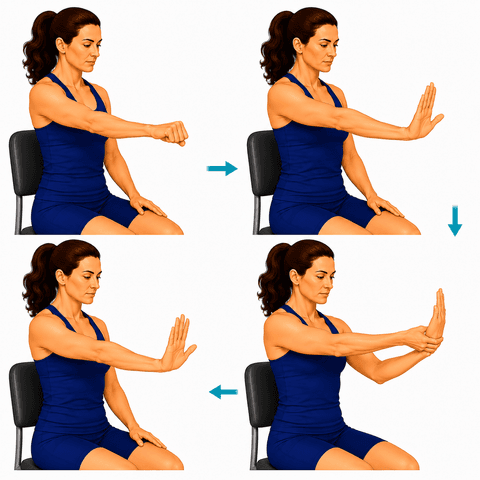
What it helps: Keeps the median nerve gliding smoothly through the carpal tunnel — easing the irritation behind carpal tunnel tingling without over-stretching a sensitive nerve.
How often: 2–3 sets of 5–10, daily.
- Start with a gentle fist, wrist neutral.
- Open the fingers straight, then bend the wrist back so the palm faces forward and fingers point up.
- Gently add a thumb stretch with the other hand if comfortable, then return. Move slowly through the sequence.
Tip: Gentle gliding — never a hard stretch, which can irritate a sensitive nerve.
2. Tendon Gliding (Finger Glides)
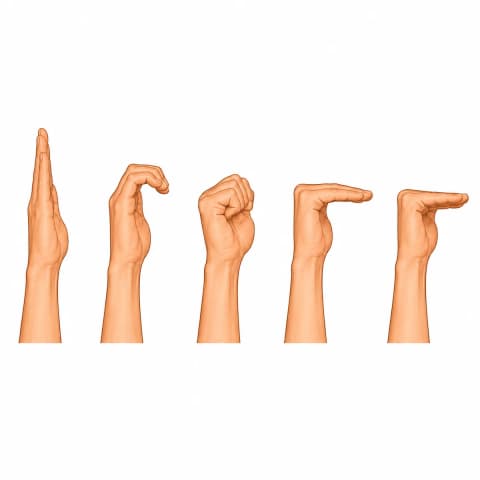
What it helps: Keeps the finger tendons sliding freely through their sheaths and the carpal tunnel — preventing stiffness and catching, and keeping the hand smooth and supple.
How often: 2–3 sets of 5–10 of each, daily.
- Start with fingers straight.
- Bend just the top two knuckles into a "hook," then straighten.
- Make a full fist, then straighten.
- Bend the big knuckles only into a "tabletop," then straighten.
- Make a "straight fist" (fingers curled but knuckles flat). Move slowly through each.
Tip: Move smoothly through the whole sequence.
3. Wrist Range of Motion
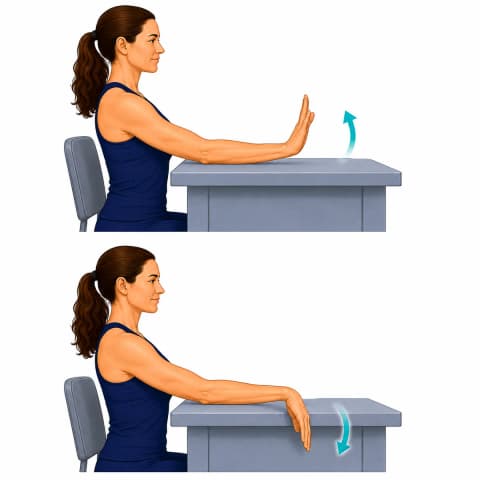
What it helps: Keeps the wrist moving through its full range — preserving the bend, straighten, and side-to-side motion you use for everyday hand tasks.
How often: 2–3 sets of 10 each, daily.
- Rest your forearm on a table with your hand just past the edge, hand open and relaxed.
- Bend the wrist up so the back of the hand rises, then down so the fingers drop, through a comfortable range.
- Then move the hand side to side — toward the thumb, then toward the little finger.
- Finally make slow circles.
Tip: Smooth, comfortable motion — don't force the ends.
4. Posture Training
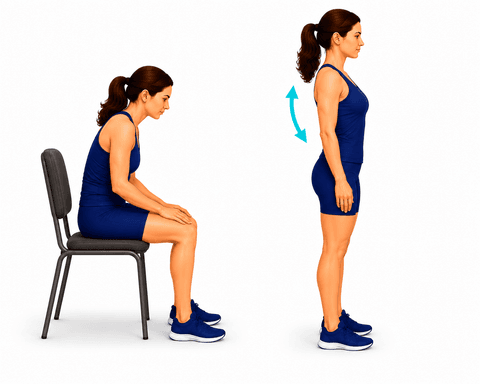
What it helps: Trains a neutral, balanced spine for sitting, standing, and lifting — good posture takes strain off the back all day long.
How often: throughout the day.
- Sit or stand tall, stacking ears over shoulders over hips.
- Gently draw your shoulder blades down and back.
- Hold a tall, relaxed neutral position; reset whenever you slouch.
Tip: Set reminders to check your posture during the day.
5. Walking Program
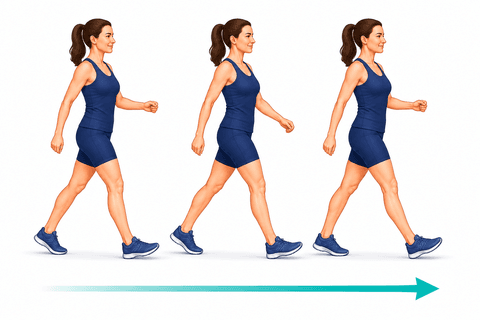
What it helps: Comfortable, frequent walking keeps the joints loose, builds your stamina, and rebuilds confidence on your feet. Little and often beats long and tiring.
How often: throughout the day.
- Take short walks at a comfortable pace.
- Increase your distance gradually as you feel able.
Tip: Use your assistive device as directed.
6. Gentle Nerve Glides
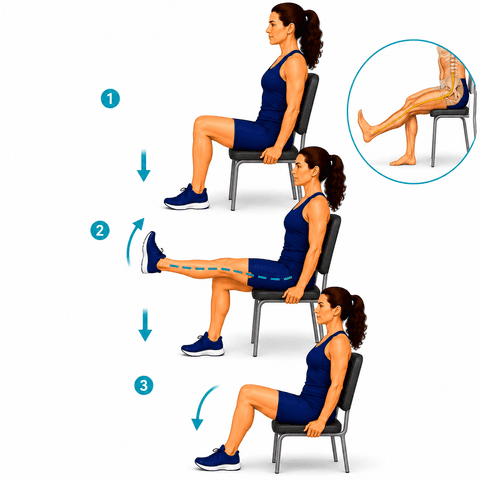
What it helps: Helps a healing nerve slide freely, which can ease leg or arm symptoms. Gentle is the rule — never push into sharp pain.
How often: 1–2 sets of 10, 1–2 times a day.
- Sit tall in a chair.
- Slowly straighten one knee while flexing your foot up, until you feel a light stretch down the leg.
- Bend the knee back down — move in and out smoothly.
Tip: Stay in a gentle, pain-free range.
7. Wrist Isometrics
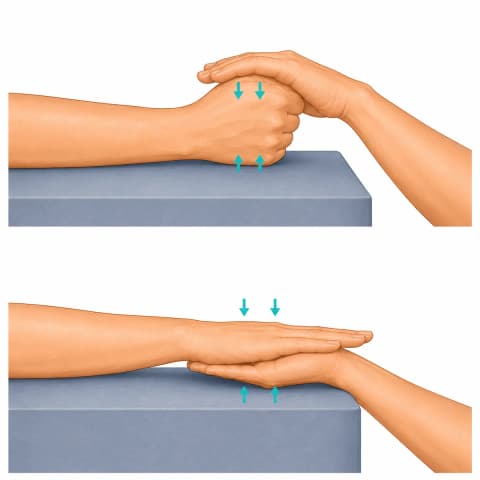
What it helps: Loads the forearm tendons gently without movement — a comfortable way to keep them strong and often to ease tendon pain before they're ready for moving resistance.
How often: 1 sets of Hold 20–45 sec ×3–5, daily.
- Rest the forearm on a table, hand off the edge. For extensors: make a light fist, push the back of the hand up against your other hand — no movement — and hold.
- For flexors: push the palm down against your other hand and hold.
- Use comfortable pressure; the wrist stays still.
Tip: No movement happens — you're holding against resistance.
8. Grip Strengthening
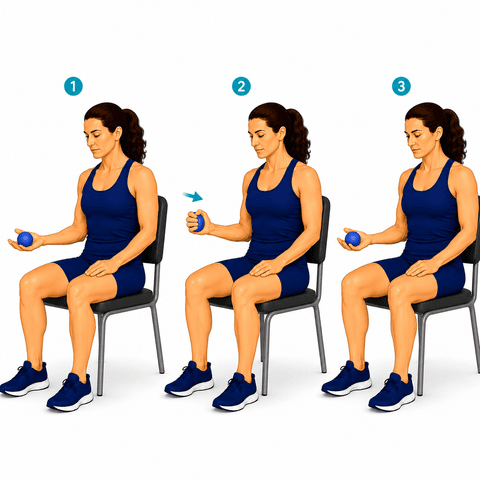
What it helps: Builds the grip and forearm strength behind almost every hand task — and supports the tendons at the elbow that grip relies on.
How often: 2–3 sets of 10–15, most days.
- Hold a soft ball or therapy putty in your hand.
- Squeeze firmly and hold a few seconds, then relax fully.
- Work through comfortable effort; stop short of sharp pain.
Tip: Full squeeze, full relax — both matter.
See the complete 25-exercise program, phase by phase.
About Carpal Tunnel Syndrome
What the condition is, how it's usually managed, and what to expect — read the Carpal Tunnel Syndrome guide.
What recovery is like
The recovery arc for this procedure — what each stage generally involves. Read Carpal Tunnel Surgery Recovery.
Recovery reading
Browse all exercise guides · Condition guides · Recovery education library
Are you a clinician? See how orthopedic practices use JointBooklet.
Are you a clinician? See how orthopedic practices use JointBooklet.
These are general exercise guides, not a personal prescription. The repetitions and frequency shown are what's commonly used — your own surgeon or therapist may advise something different, and their guidance comes first.