Ankle Arthroscopy (Debridement) Exercise Guide

A phase-by-phase exercise program used in recovery for ankle arthroscopy (debridement). Each movement includes what it's working on and how it's typically performed. Your own surgeon's or therapist's guidance always comes first.

Also used for: Ankle Arthroscopy (Cartilage Repair), Ankle Arthroscopy (Limited Debridement), Ankle Arthroscopy (Loose Body Removal). The rehabilitation for these is the same, so they share one guide.

Phase 1

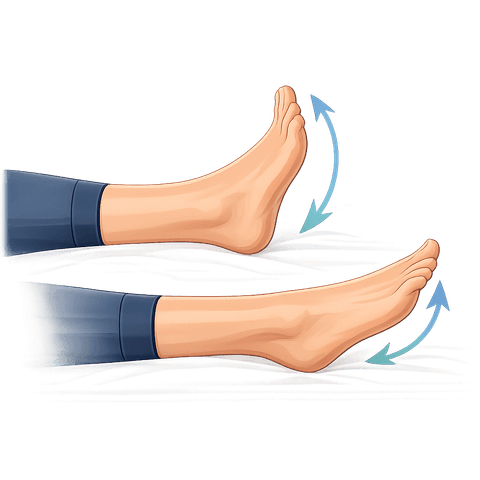
Ankle Pumps

Ankle Pumps exercise illustration

Improves circulation and helps reduce swelling.

What it helps: Keeps blood moving to reduce swelling and the risk of clots while you're less active — small, frequent, and important early on.

  1. Flex your foot up, pointing your toes toward the ceiling.
  2. Point your toes down, away from your body.

Tips:

  • Move slowly and with control.

Commonly done as 20 repetitions, several times a day.

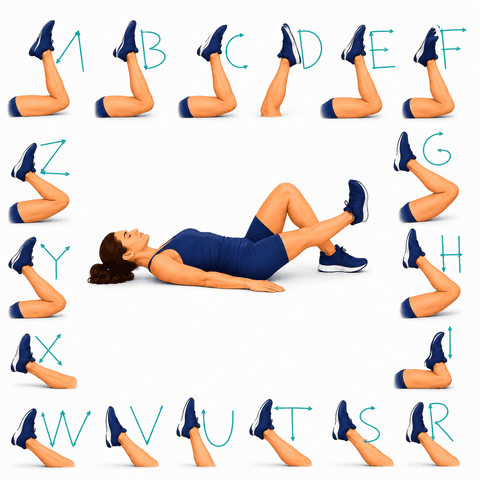
Ankle Alphabet

Ankle Alphabet exercise illustration

Traces the alphabet with the foot to restore ankle motion in every direction.

What it helps: Moves the ankle through its full range while you trace each letter — restoring motion in every direction.

  1. With the leg supported, slowly "draw" each letter of the alphabet using your big toe.
  2. Move from the ankle, keeping the leg still.

Tips:

  • Move within a comfortable, pain-free range.

Commonly done as 1-2 sets of A–Z, a few times a day.

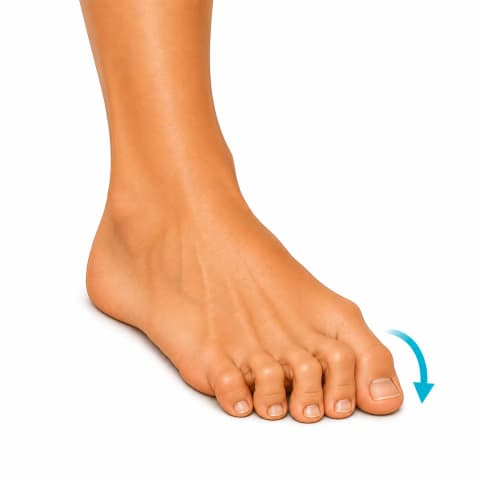
Toe Curls

Strengthens the small muscles under the foot.

What it helps: Strengthens the small muscles under the foot that support your arch and grip the ground.

  1. Seated with your foot flat, curl your toes downward as if gripping the floor.
  2. Hold briefly, then relax.

Tips:

  • Keep the motion gentle and controlled.

Commonly done as 2 sets of 10-15, daily.

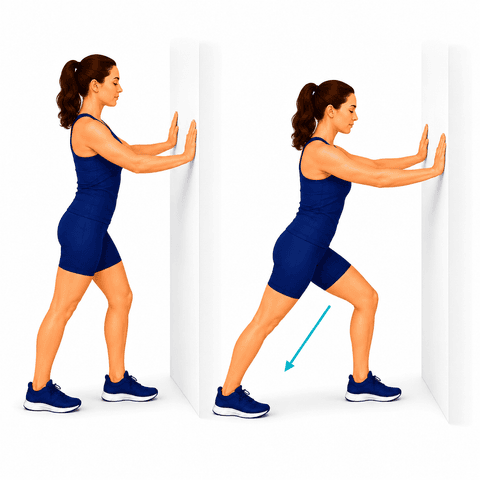
Calf Stretch

Calf Stretch exercise illustration

Keeps the calf and Achilles flexible, easing tension on the arch.

What it helps: Keeps the calf and Achilles supple, easing tension through the ankle and the arch of the foot.

  1. Stand facing a wall, hands on the wall, surgical leg back.
  2. Keep the back knee straight and heel down, and lean forward until you feel a stretch in the calf.
  3. Then bend the back knee slightly to stretch a little lower.

Tips:

  • Keep the stretch gentle and steady — no bouncing.

Commonly done as 3 sets of 20–30 sec hold, daily.

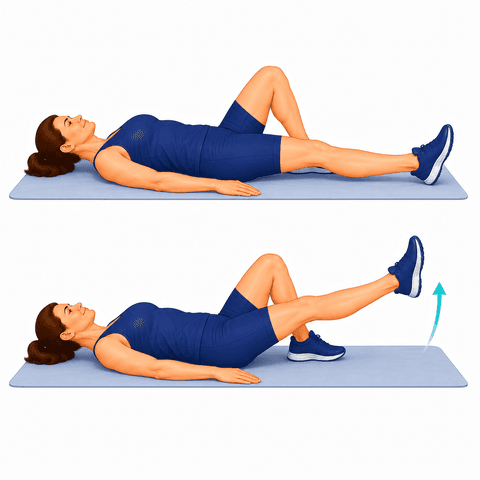
Straight Leg Raises

Straight Leg Raises exercise illustration

Strengthens the thigh while protecting the joint.

What it helps: Builds quad and hip strength while the knee stays straight, so the muscle works hard without stressing the joint.

  1. Lie down with one leg bent and the other straight.
  2. Tighten your thigh and lift the straight leg a few inches.
  3. Lower slowly.

Tips:

  • Keep the knee straight as you lift.

Commonly done as 2-3 sets of 10, once or twice a day.

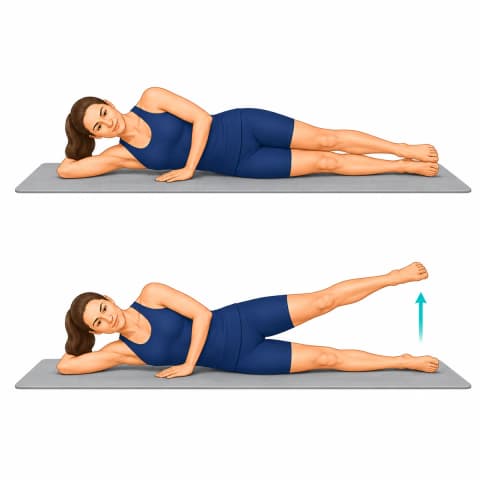
Hip Abduction

Strengthens the outer hip while you stay off the foot.

What it helps: Strengthens the outer-hip muscles that keep your hip level and steady — strength you can build without putting any weight through your healing foot.

  1. Lie on your side with the surgical leg on top, legs straight.
  2. Lift the top leg upward a comfortable distance, keeping it in line with your body.
  3. Lower slowly.

Tips:

  • Keep your toes pointing forward, not up toward the ceiling.

Commonly done as 2-3 sets of 10, daily.

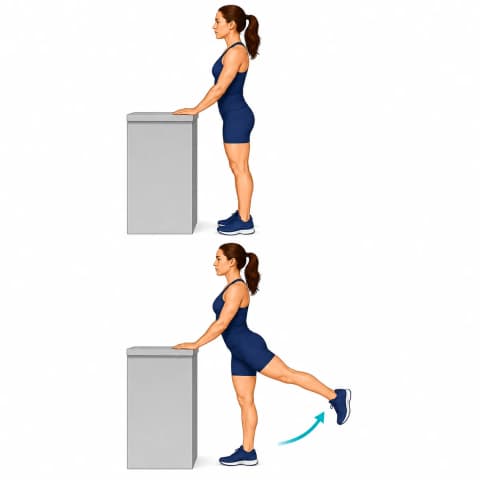
Hip Extension

Strengthens the back of the hip and buttock without loading the ankle.

What it helps: Strengthens the glutes and the muscles behind the hip that power each step — built while staying off the foot.

  1. Lie on your stomach, or stand holding a counter for support.
  2. Keeping your leg straight, lift it gently backward.
  3. Lower slowly.

Tips:

  • Move from the hip and avoid arching your low back.

Commonly done as 2-3 sets of 10, daily.

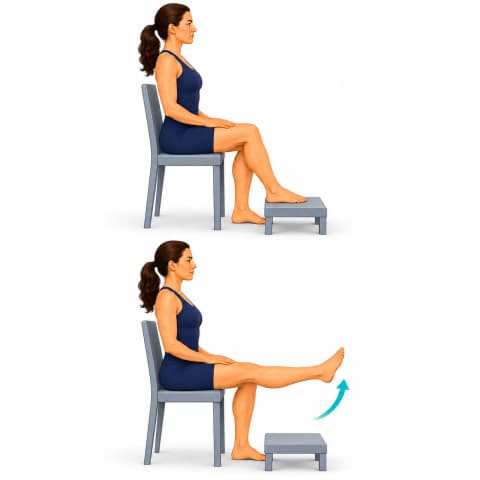
Seated Knee Extensions

Keeps the thigh strong while you stay off the foot.

What it helps: Keeps the thigh strong and the knee straightening well while you stay off your feet.

  1. Sit in a chair with your foot supported.
  2. Straighten your knee, lifting the lower leg.
  3. Lower slowly.

Tips:

  • Keep the movement at the knee, not the ankle.

Commonly done as 2-3 sets of 10, once or twice a day.

Phase 2

Ankle Pumps

Ankle Pumps exercise illustration

Improves circulation and helps reduce swelling.

What it helps: Keeps blood moving to reduce swelling and the risk of clots while you're less active — small, frequent, and important early on.

  1. Flex your foot up, pointing your toes toward the ceiling.
  2. Point your toes down, away from your body.

Tips:

  • Move slowly and with control.

Commonly done as 20 repetitions, several times a day.

Ankle Circles

Ankle Circles exercise illustration

Moves the ankle through gentle circles to restore motion.

What it helps: Gently moves the ankle in every direction so it doesn't stiffen as it heals.

  1. Seated with the leg supported, slowly circle the foot in one direction.
  2. Then circle it the other direction.
  3. Move smoothly through a comfortable range.

Tips:

  • Keep the circles gentle and pain-free.

Commonly done as 2 sets of 10 each way, daily.

Theraband Dorsiflexion

Strengthens the muscles that lift the foot, using a resistance band.

What it helps: Strengthens the muscles that lift your foot, so you clear the ground cleanly and don't catch your toes.

  1. Sit with your leg out and loop a band around the top of your foot, anchored in front of you.
  2. Slowly pull your foot up toward you against the band.
  3. Return slowly to the start.

Tips:

  • Keep the motion smooth and within a comfortable range.

Commonly done as 2-3 sets of 10-15, daily.

Theraband Plantarflexion

Gently rebuilds the downward push of the ankle using a resistance band.

What it helps: Rebuilds the downward push of the ankle that powers walking and stairs.

  1. Sit with your leg out in front and loop a resistance band around the ball of your foot.
  2. Hold the ends and slowly press your foot downward against the band, like pressing a gas pedal.
  3. Return slowly to the start.

Tips:

  • Keep the motion smooth and within a comfortable, pain-free range.

Commonly done as 2-3 sets of 10-15, daily.

Theraband Inversion

Theraband Inversion exercise illustration

Strengthens the muscles that turn the foot inward, balancing the ankle.

What it helps: Strengthens the muscles that turn the foot inward, helping balance and steady the ankle.

  1. Sit with a band looped around the inside of your foot, anchored to the opposite side.
  2. Slowly turn your foot inward against the band.
  3. Return slowly.

Tips:

  • Keep the motion controlled and within comfort.

Commonly done as 2-3 sets of 10-15, daily.

Theraband Eversion

Theraband Eversion exercise illustration

Strengthens the peroneal tendons that turn the foot outward.

What it helps: Strengthens the muscles on the outside of the ankle that protect it from rolling.

  1. Sit with a resistance band looped around the outside of your foot, anchored to the opposite side.
  2. Slowly turn your foot outward against the band.
  3. Return slowly to the start.

Tips:

  • Keep the movement slow and controlled, within a comfortable range.
  • Your care team can guide when to start and how much to progress.

Commonly done as 2-3 sets of 10-15, daily.

Standing Weight Shifts

Builds comfort bearing weight evenly through both feet.

What it helps: Gently retrains you to load each leg evenly and confidently — the first step back to steady, balanced walking.

  1. Stand holding a counter, feet hip-width apart.
  2. Slowly shift your weight from one foot to the other.
  3. Keep the movement smooth and controlled.

Tips:

  • Let comfort guide how much weight you shift onto the surgical side.

Commonly done as 2-3 sets of 10, daily.

Stationary Bike

Stationary Bike exercise illustration

Builds motion and endurance with low impact.

What it helps: Keeps the joints moving and nourished while you build endurance — all with no pounding. One of the gentlest ways to stay active when a joint is sore.

  1. Set the seat so pedaling is comfortable.
  2. Pedal at an easy pace.
  3. Increase your time gradually.

Commonly done as directed.

Phase 3

Double-Leg Heel Raises

Double-Leg Heel Raises exercise illustration

Begins rebuilding calf strength using both legs together.

What it helps: Begins rebuilding calf strength using both legs together to share the load.

  1. Stand holding a counter for support.
  2. Rise up onto the balls of both feet.
  3. Lower slowly with control.

Tips:

  • Share the load across both feet at first.

Commonly done as 2-3 sets of 10-15, daily.

Single-Leg Balance

Single-Leg Balance exercise illustration

Improves balance and stability.

What it helps: Trains your hip and leg to stay steady when all your weight is on one side — which is most of walking. Better balance means a surer, more confident step.

  1. Stand near a counter for safety.
  2. Lift one foot and balance on the other leg.
  3. Hold as able.

Commonly done daily.

Mini Squats

Mini Squats exercise illustration

Builds leg strength through a comfortable range.

What it helps: Builds hip and leg strength through a comfortable range, so everyday moves — sitting, standing, bending — take less out of your joints.

  1. Stand holding a counter.
  2. Bend your knees a small amount, keeping them behind your toes.
  3. Return to standing.

Commonly done as 2-3 sets of 10, once or twice a day.

Step-Ups

Step-Ups exercise illustration

Builds strength for stairs and daily activity.

What it helps: Builds the leg and hip strength — and the control — for stairs, curbs, and everyday activity.

  1. Step up onto a low step with your operative leg.
  2. Step back down with control.

Tips:

  • Hold a rail for balance.

Commonly done as 2-3 sets of 10, once or twice a day.

Step-Ups & Step-Downs

Step-Ups & Step-Downs exercise illustration

Advances stair strength and control.

What it helps: Advances your stair strength and the control to come down as confidently as you go up.

  1. Step up onto a step, then step down slowly.
  2. Control the lowering phase.

Tips:

  • Hold a rail for balance.

Commonly done as 2-3 sets of 10, once or twice a day.

Walking Program

Walking Program exercise illustration

Short, frequent walks build endurance and confidence.

What it helps: Comfortable, frequent walking keeps the joints loose, builds your stamina, and rebuilds confidence on your feet. Little and often beats long and tiring.

  1. Take short walks at a comfortable pace.
  2. Increase your distance gradually as you feel able.

Tips:

  • Use your assistive device as directed.

Commonly done throughout the day.

Elliptical Trainer

Elliptical Trainer exercise illustration

Low-impact cardio that is easy on the joints.

What it helps: Low-impact cardio that builds endurance and keeps the legs moving while staying easy on the joints.

Commonly done as able.

Resistance Band Side-Stepping

Strengthens the hips and ankles with side-to-side stepping against a band.

What it helps: Strengthens the side-hip muscles through movement, the way you actually use them — great for stability and a level stride.

  1. Place a loop band around your legs (above the ankles or knees).
  2. Step sideways against the band's resistance, keeping tension.
  3. Step several times one way, then back.

Tips:

  • Keep your steps controlled and your knees tracking forward.

Commonly done as 2-3 sets of 10 each way, several times a week.

Phase 4

Single-Leg Heel Raises

A key strength milestone — calf raises on the surgical leg alone.

What it helps: Calf strength on one leg — a milestone that means the ankle can power a normal step on its own.

  1. Stand holding a counter for balance.
  2. Rise onto the ball of your surgical foot only.
  3. Lower slowly.

Tips:

  • Build repetitions gradually — this strength often returns slowly.

Commonly done as 2-3 sets of 8-12, daily.

Lunges

Lunges exercise illustration

Builds leg strength and control through a larger range.

What it helps: Builds leg and hip strength and control through a larger range, preparing you for more demanding activity.

  1. Step forward into a comfortable lunge, lowering your back knee toward the floor.
  2. Keep your front knee tracking over your foot.
  3. Push back to standing.

Tips:

  • Start shallow and progress the depth as strength allows.

Commonly done as 2-3 sets of 8-12, several times a week.

Balance Board Training

Balance Board Training exercise illustration

Challenges the ankle's steadiness on a gently unstable surface.

What it helps: Challenges the ankle to react and steady itself on an unstable surface — the control that helps prevent rolls and falls.

  1. Stand near a counter for support and place both feet on a balance or wobble board.
  2. Slowly tilt the board forward, back, and side to side under control.
  3. Progress toward more movement as your steadiness improves.

Tips:

  • Keep a hand or fingertip on support until you feel secure.

Commonly done as 2-3 sets, several times a week.

Lateral Step-Ups

Strengthens the leg and ankle with controlled side-to-side stepping.

What it helps: Strengthens the leg and ankle with controlled side-to-side stepping, building stability in every direction.

  1. Stand beside a low step.
  2. Step up sideways onto the step with the surgical leg, then lower slowly.
  3. Keep your knee tracking over your foot.

Tips:

  • Start with a low step and progress the height gradually.

Commonly done as 2-3 sets of 8-12, daily.

Hiking

Walking on trails and varied terrain as endurance and confidence return.

What it helps: Walking varied terrain builds endurance, balance, and confidence as you return to the outdoors.

  1. Start with short, flat trails.
  2. Build distance and add gentle inclines as comfort allows.

Tips:

  • Supportive footwear and trekking poles can help early on.

Commonly done as cleared.

Functional Strength Training

Functional Strength Training exercise illustration

Task-based strengthening that rebuilds the movements of daily life and activity.

What it helps: Trains the real movements of daily life — lifting, carrying, squatting — with good mechanics, so everyday tasks feel easier.

  1. Work through functional movements — squats, step-ups, lunges, and balance — as cleared.
  2. Add resistance gradually.

Tips:

  • Quality of movement first, then load.

Commonly done several times a week.

Walking Program

Walking Program exercise illustration

Short, frequent walks build endurance and confidence.

What it helps: Comfortable, frequent walking keeps the joints loose, builds your stamina, and rebuilds confidence on your feet. Little and often beats long and tiring.

  1. Take short walks at a comfortable pace.
  2. Increase your distance gradually as you feel able.

Tips:

  • Use your assistive device as directed.

Commonly done throughout the day.

Stair Training

Stair Training exercise illustration

Practices safe, confident stair use.

What it helps: Practices safe, confident stair use — strength and control for one of the most demanding everyday tasks.

  1. Practice going up and down stairs with a rail.
  2. Lead as directed by your therapist.

Commonly done as directed.

Phase 5

Running Program

Structured return to running, building distance and pace over time.

What it helps: A structured return to running that builds distance and pace gradually, so the body keeps up with the load.

  1. Progress from jog/walk intervals to continuous easy running.
  2. Add distance before speed.

Tips:

  • Build up gradually to protect the healing tendon.

Commonly done as cleared.

Agility Ladder Drills

Agility Ladder Drills exercise illustration

Sharpens quick, coordinated footwork as you return to activity.

What it helps: Sharpens quick, coordinated footwork — the foundation of agile, confident movement.

  1. Using a floor ladder or marked spots, step quickly through with various patterns.
  2. Start slow and controlled, building speed as able.

Tips:

  • Only begin once cleared — quality of movement comes before speed.

Commonly done as cleared.

Plyometric Progression

Plyometric Progression exercise illustration

Gradual hopping and jumping work to rebuild power and spring.

What it helps: Gradual hopping and jumping that rebuilds power and spring — and trains your legs to absorb landing forces safely.

  1. Begin with small, two-foot hops.
  2. Progress toward single-leg and directional hops as able.

Tips:

  • Favor quality and control over height or speed.

Commonly done as cleared.

Single-Leg Hop Progression

Rebuilds power and confidence hopping on the surgical leg.

What it helps: Rebuilds power and confidence hopping on one leg — a key test that the leg can take impact on its own.

  1. Begin with small, controlled hops on the surgical leg.
  2. Progress distance and add directions as control improves.

Tips:

  • Favor soft, controlled landings; only progress once cleared.

Commonly done as cleared.

Lateral Shuffles

Rebuilds side-to-side movement for sport and active days.

What it helps: Rebuilds controlled side-to-side movement for sport and active days.

  1. In an athletic stance, shuffle sideways several steps, then back.
  2. Stay low and controlled.

Tips:

  • Build speed and distance gradually.

Commonly done as cleared.

Sport-Specific Training

Practicing the movements of your sport as you prepare to return.

What it helps: Practicing the actual movements of your sport, so your return feels natural and prepared.

  1. Rehearse the specific drills and movements your activity requires.
  2. Build volume and intensity gradually.

Tips:

  • Confidence and symmetry are good signs of readiness.

Commonly done as cleared.

Dynamic Balance Training

Dynamic Balance Training exercise illustration

Challenges balance with movement to prepare for activity and sport.

What it helps: Challenges your balance with movement, preparing you for the unpredictable demands of daily life and activity.

  1. Practice controlled single-leg balance, then add reaching or gentle movement.
  2. Progress to uneven surfaces as able.

Tips:

  • Keep support nearby as you progress.

Commonly done as 2-3 sets, several times a week.

Strength Training

Strength Training exercise illustration

Maintains and builds long-term strength.

What it helps: Builds and maintains long-term strength to keep you active, resilient, and independent.

Commonly done a few times a week.

Recovery reading

Browse all exercise guides · Condition guides · Recovery education library

These are general exercise guides, not a personal prescription. The repetitions and frequency shown are what's commonly used — your own surgeon or therapist may advise something different, and their guidance comes first.